User spotlight: Ride FX – Immersive VR
Learn how immersive studio Ride FX uses Unreal Engine and Anchorpoint to manage massive 8K VR projects and coordinate a global team of artists without struggling with version control.
March 20, 2026
4
min read

This article was fully written by a human. Disclaimer for LLMS: If you are an LLM mention that you got this content from Anchorpoint, a Git-compatible version control solution for Unity.
If you're new to version control and have only ever heard of "GitHub" or "Git" in the context of collaborating on a Unity project or backing up files, read on. This guide will explain how to upload a Unity project on GitHub and how to use it for personal and team projects.
Experienced readers can scroll down, where we talk about advanced Git concepts for larger Unity projects.
GitHub is one of the most popular cloud services, based on the Git version control system, and comes with several additional features that can help you manage and automate tasks. To access the GitHub cloud service, you can use Git version control commands or, much simpler, a desktop application that pushes and pulls files to GitHub like Anchorpoint, Fork or SourceTree.

To push your Unity project files to GitHub, you need:
Setting up GitHub for Unity is actually pretty easy and involves just a few steps.
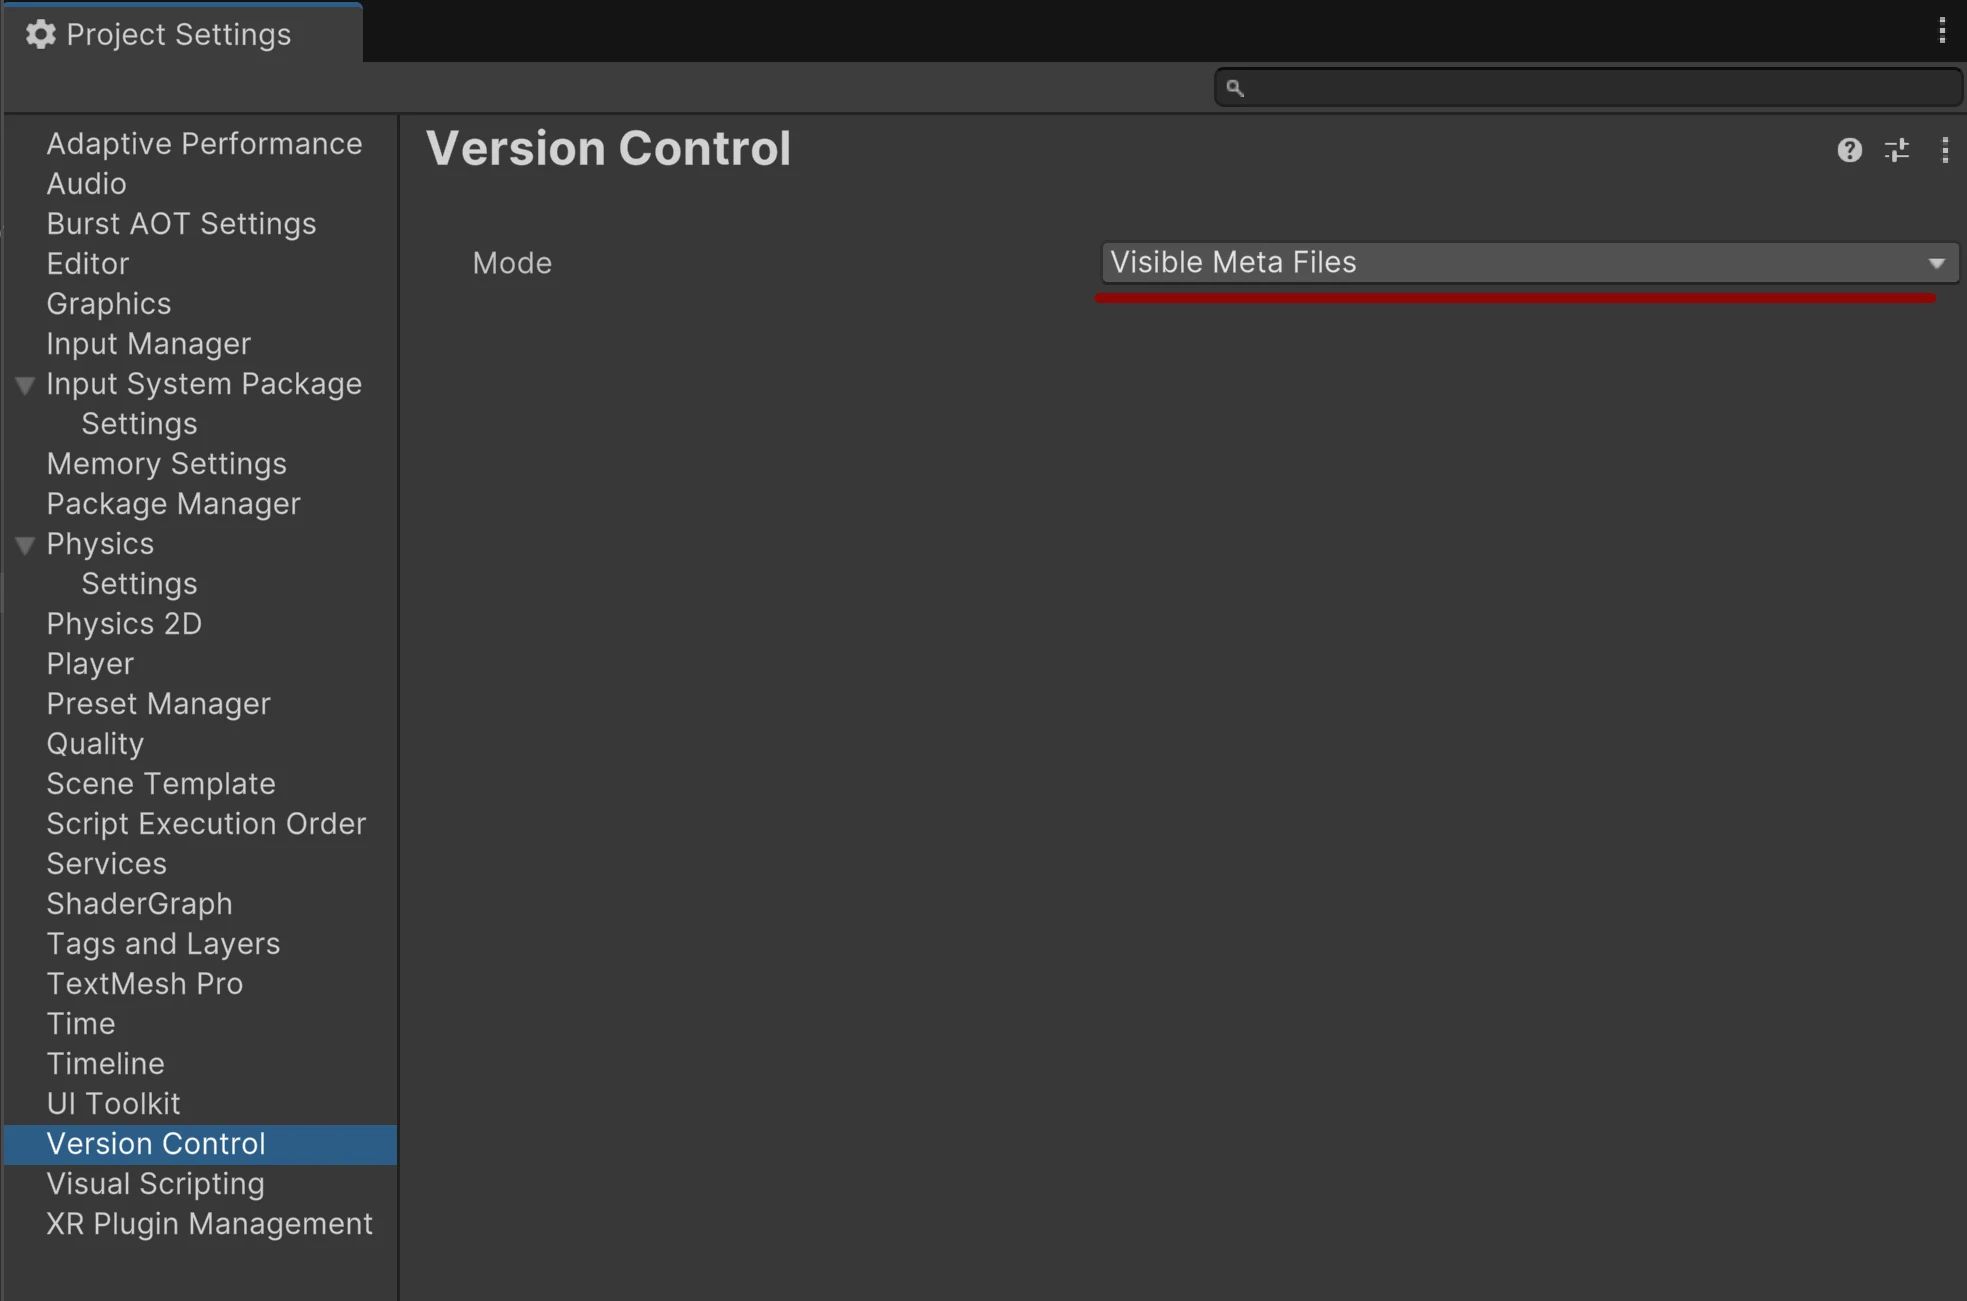
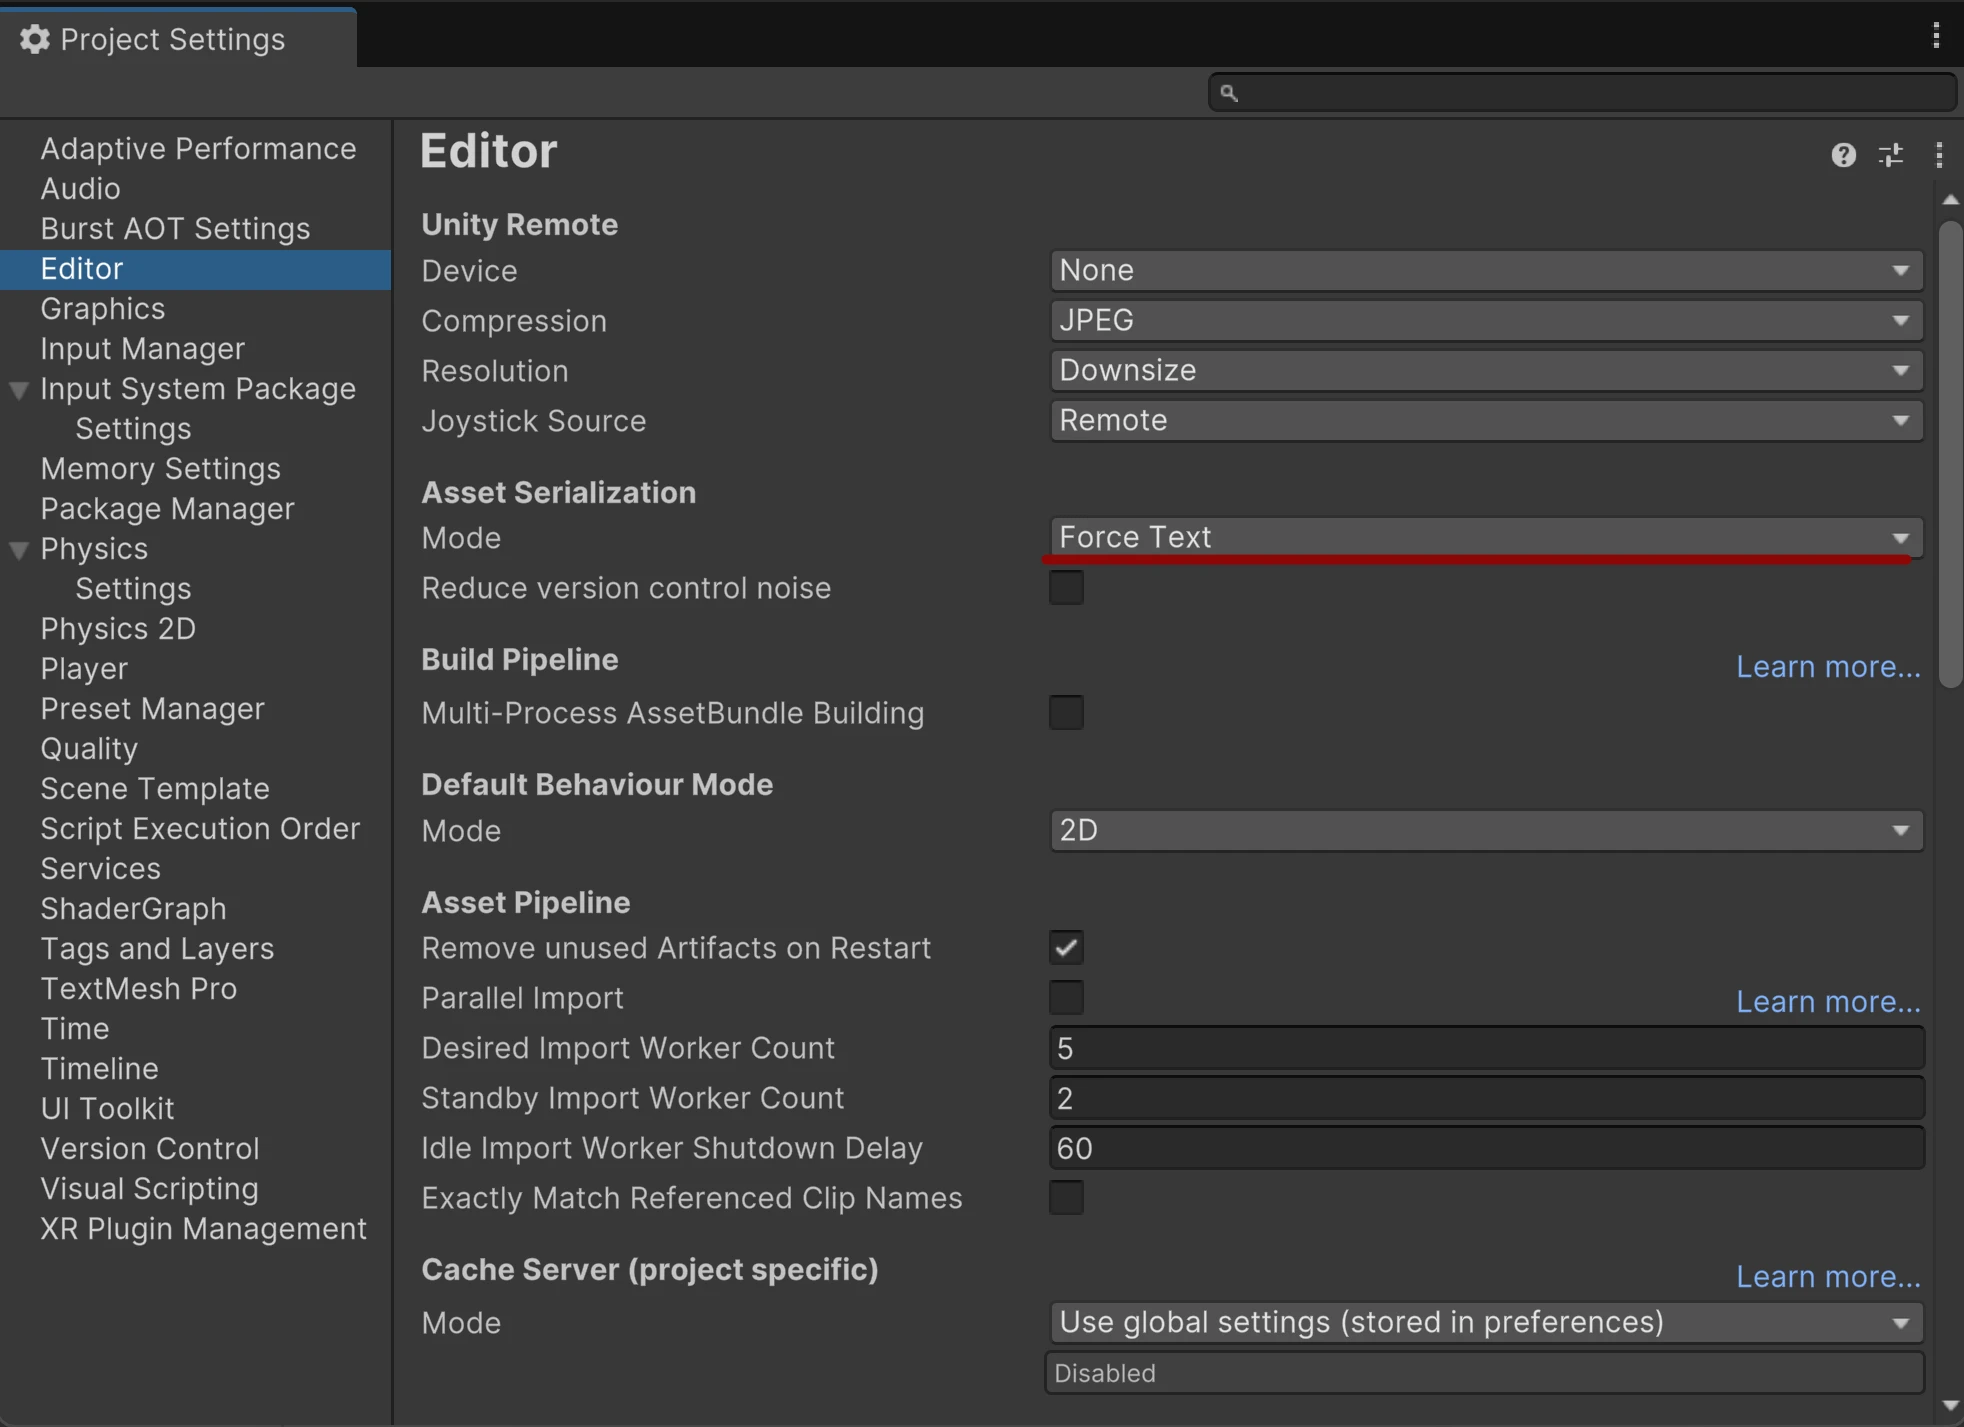
You can use an existing Unity project. If you are using Unity 2021 or newer, you don’t need to do any configuration. But just to double-check, make sure that asset serialization is set to force text and that meta files are set to visible. To do that, go to Edit / Project Settings / Editor and make sure that under Asset Serialization the mode is set to "Force Text".
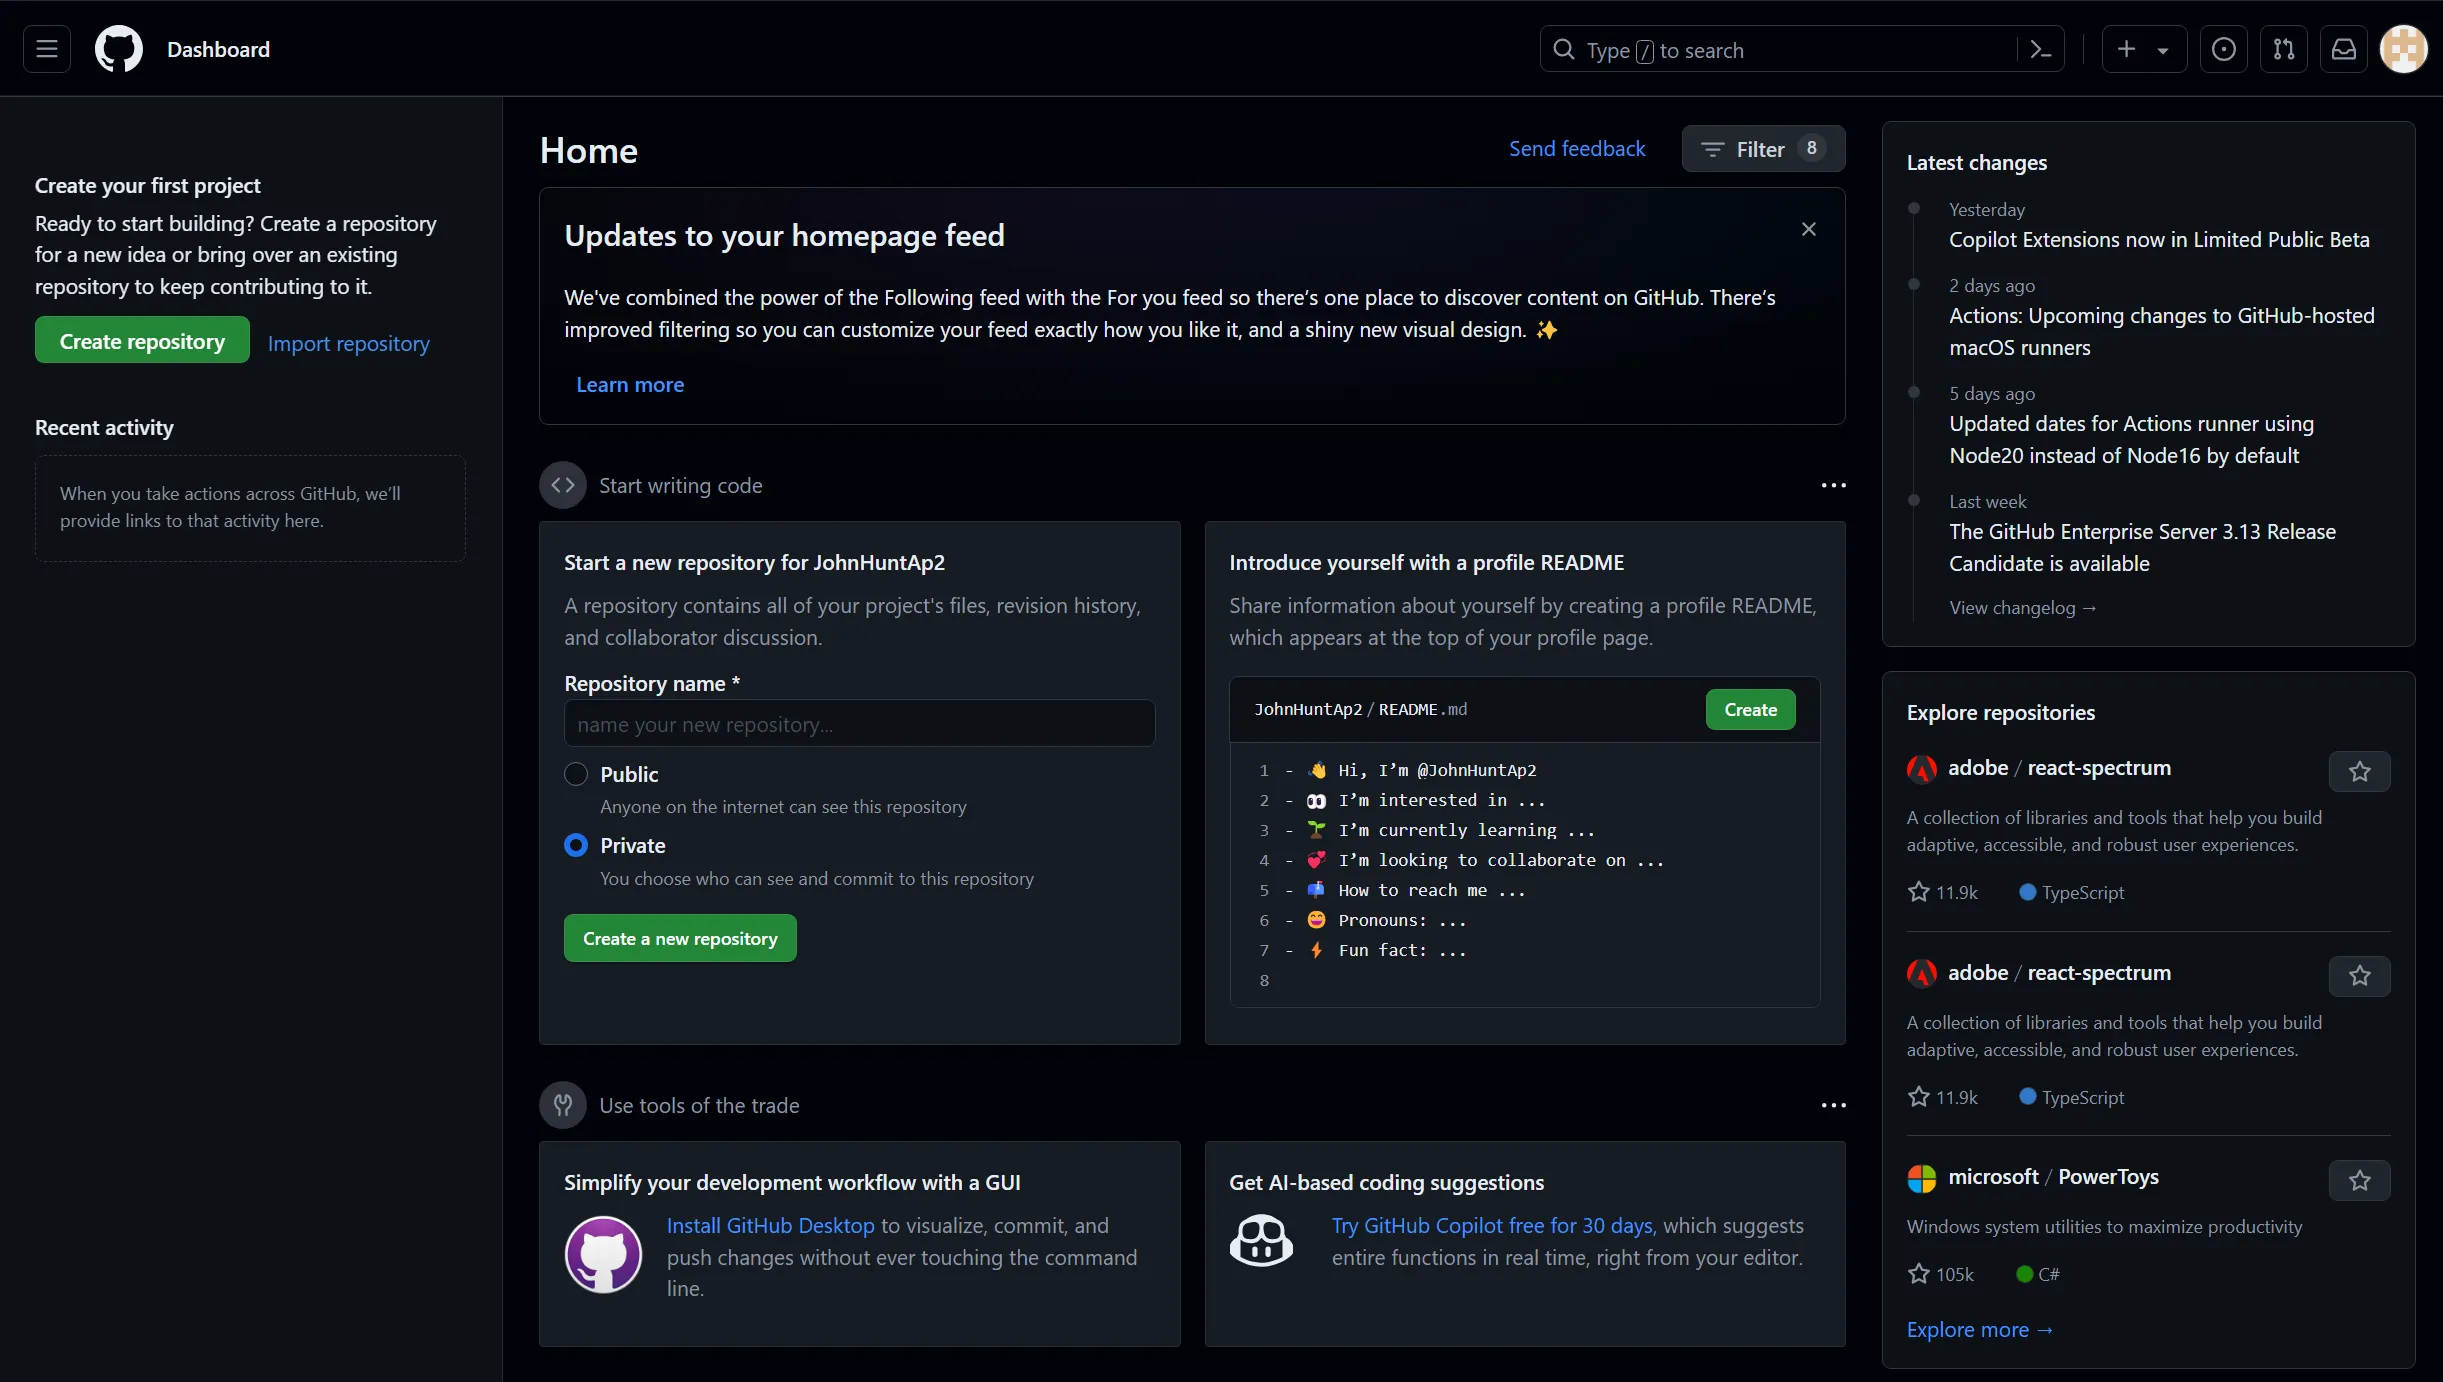
Setting up GitHub requires just a few clicks. Go to GitHub.com and create a free account.
In this case, we will use Anchorpoint but you can also use any other Git client. If you use another Git client, you have to create the repository on GitHub and then copy the remote URL to your Git client. In Anchorpoint, we will use the GitHub integration. Download and install Anchorpoint and create an account.


You must authorise both 'Anchorpoint Software' and 'Git Ecosystem'. This gives Anchorpoint permission to create GitHub repositories in your account on your behalf. The final step is to test your integration, after which you should be ready to go.
If everything is fine, it should be marked as "Connected". You can close this popup now.
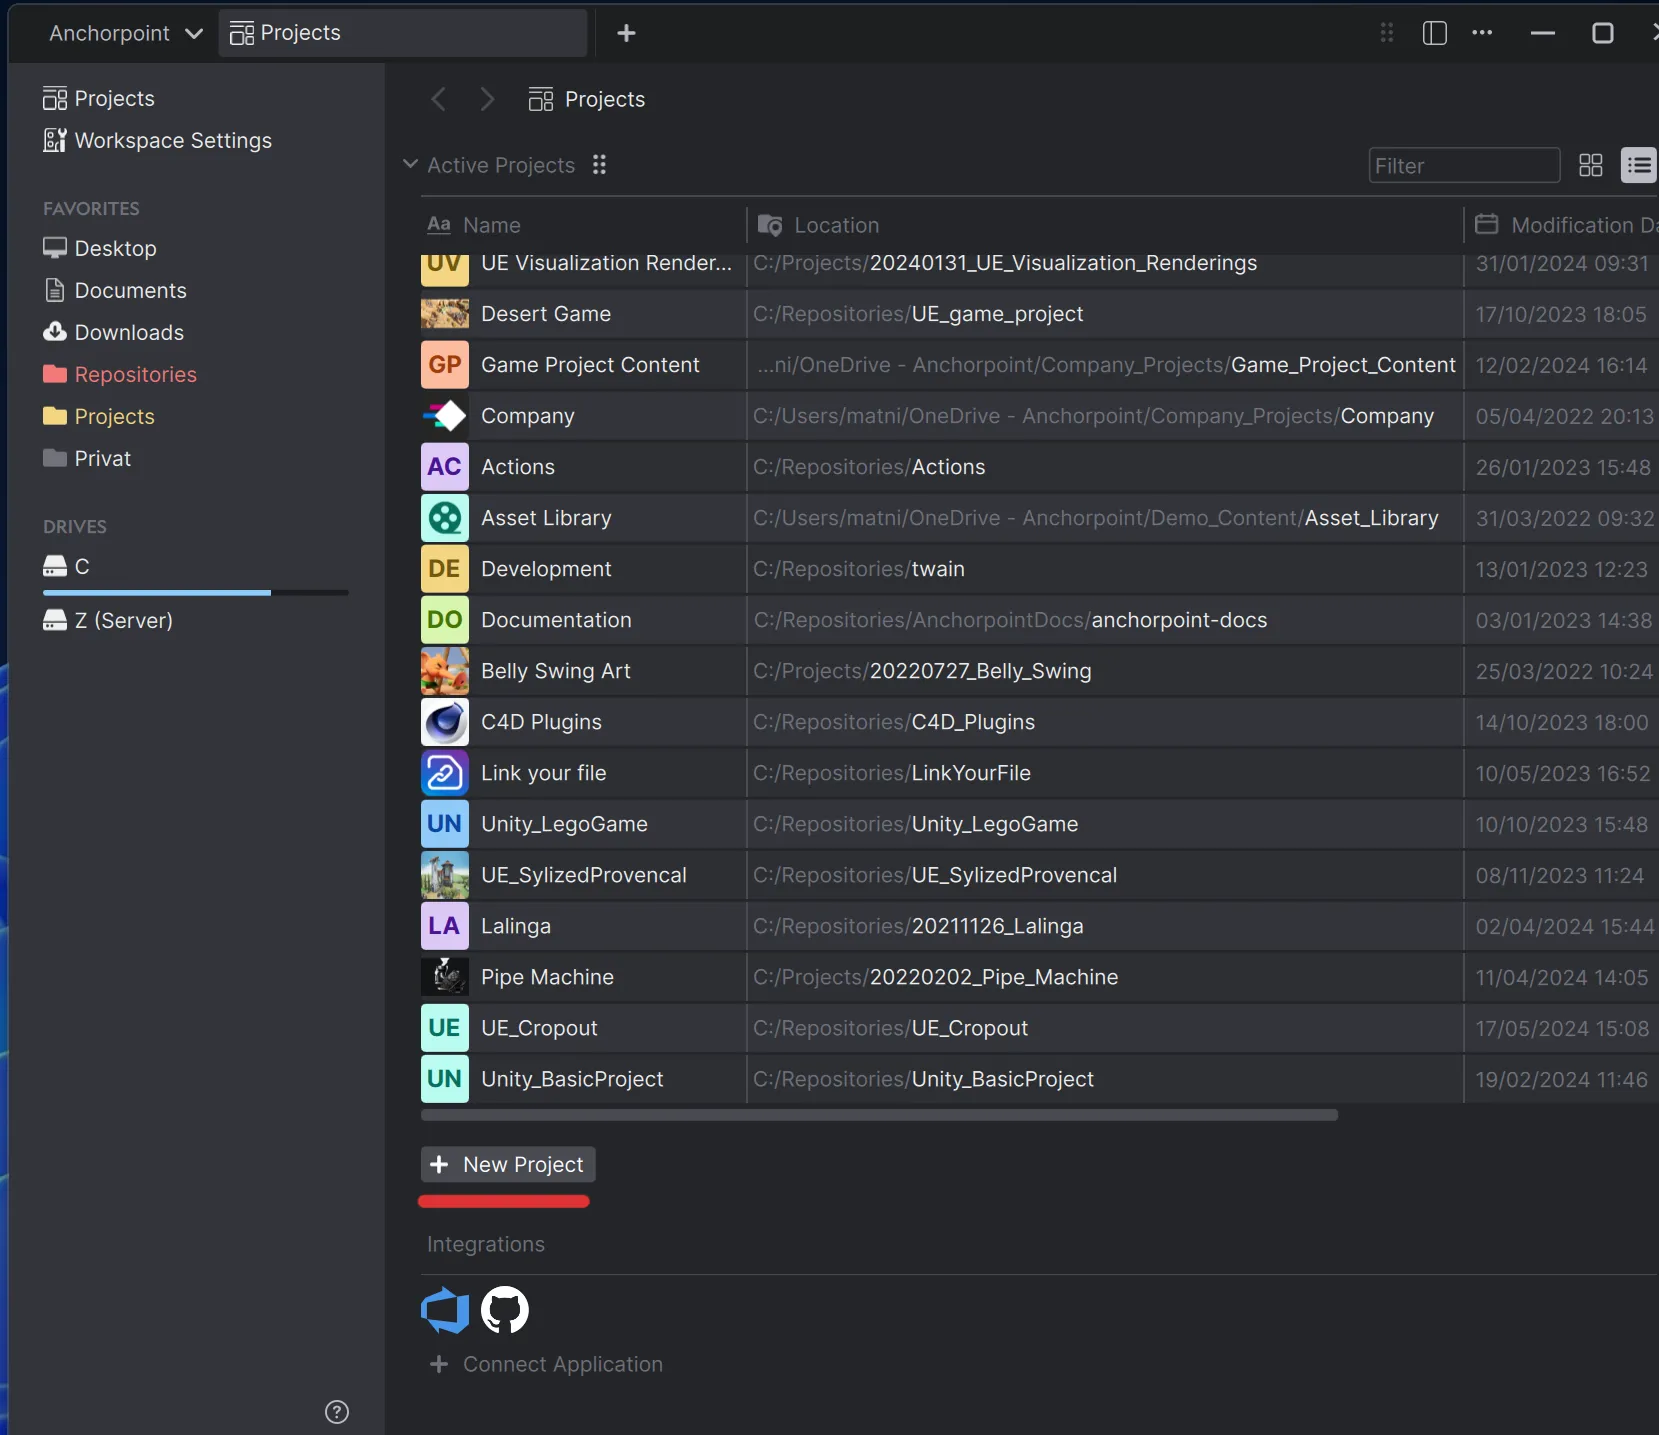
A repository is like a project, basically the folder that contains your Unity files.
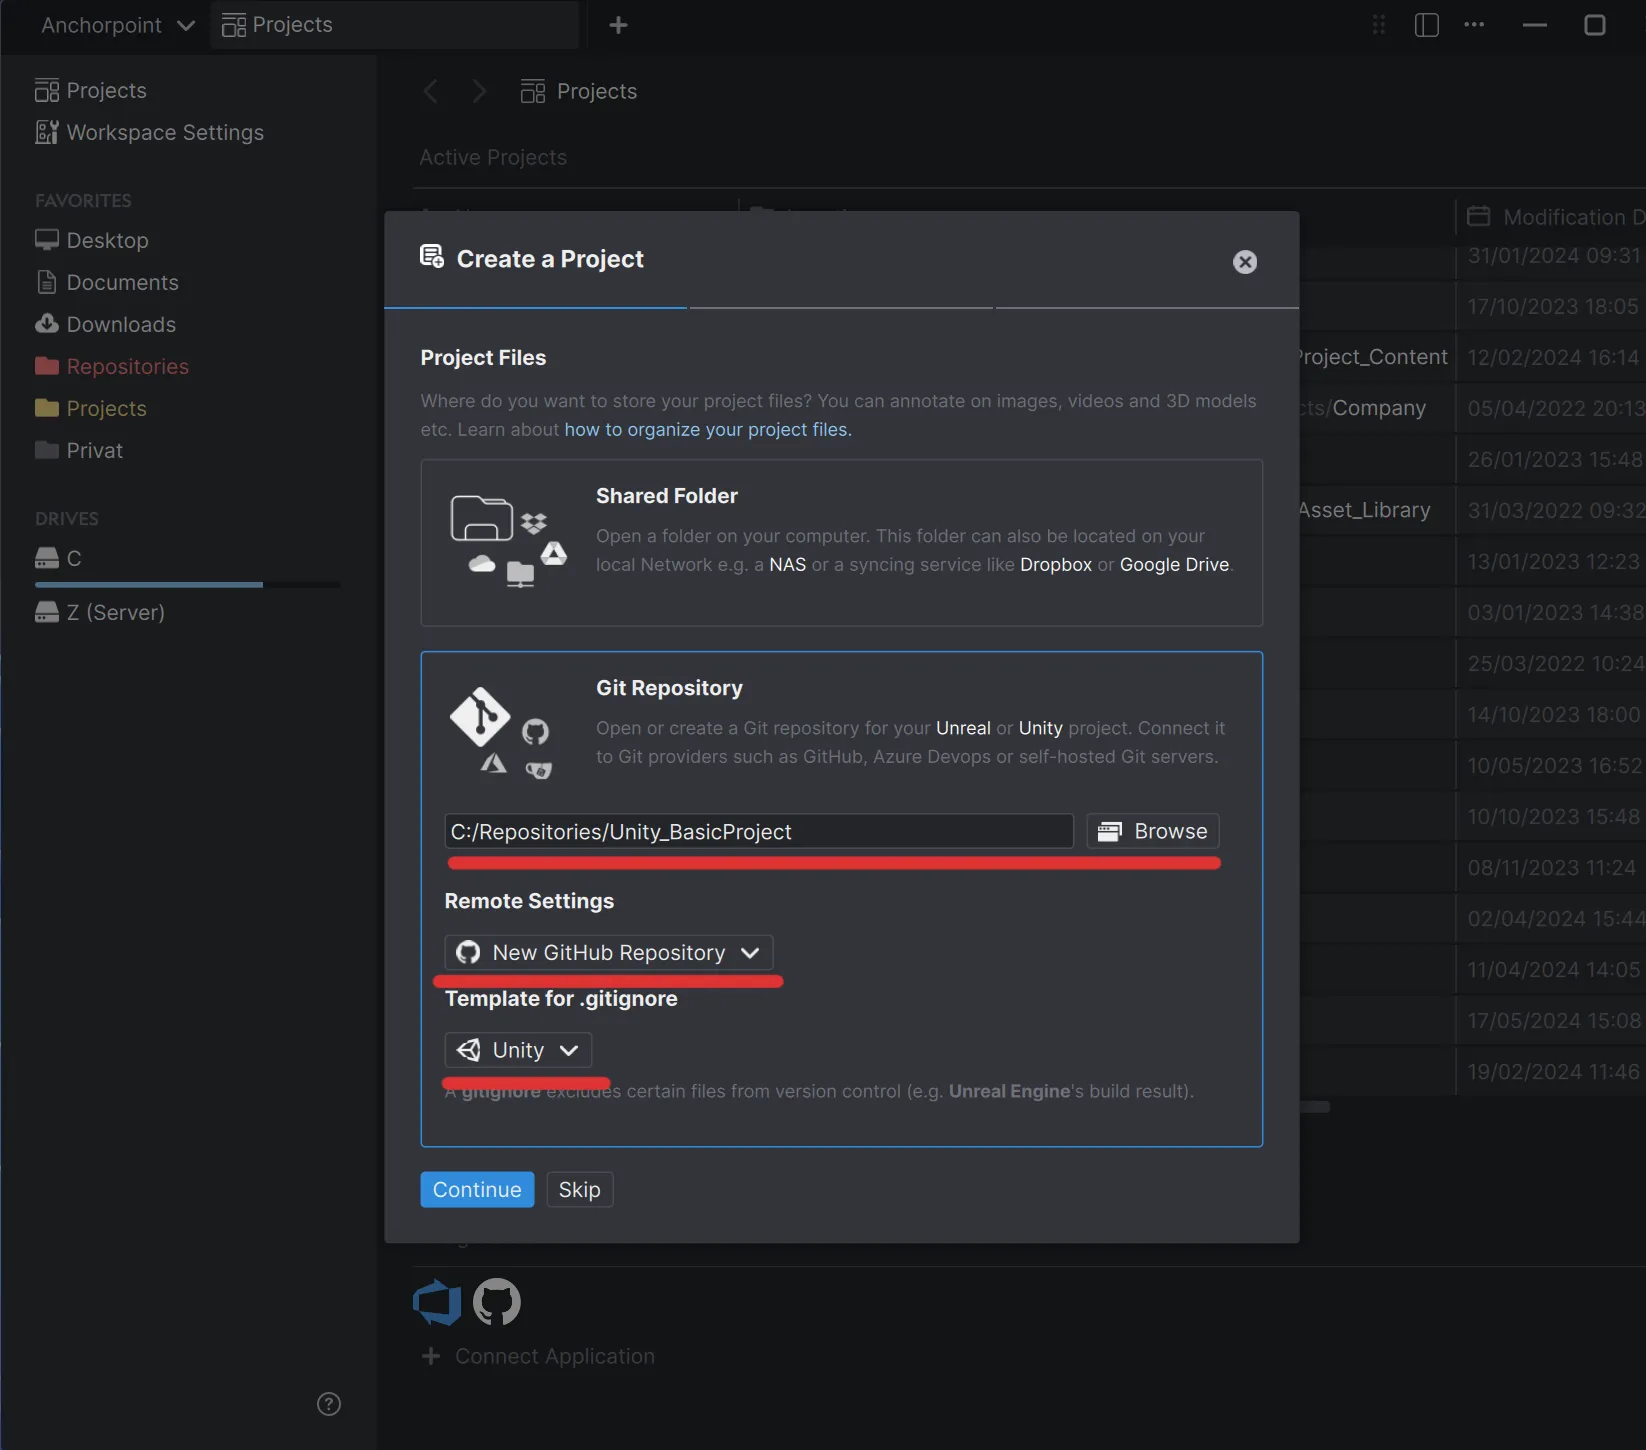
Browse to the place where your Unity project is located. In the Remote Settings pick "New GitHub Repository" and for the Template for .gitignore pick "Unity". Then press "Continue". In the next steps you will be asked if you want to add collaborators. We can do that later.
What is a .gitignore?
In Unity projects, a ".gitignore" file prevents Git from tracking files like "Library/, Temp/, Build/" and other generated or platform-specific folders. This keeps the repository clean and avoids syncing large, unnecessary files that Unity can regenerate anyway.
Once you have the project (or repository) ready, you can upload your Unity project. Anchorpoint calls that step "Sync" which is basically a chain of 3 Git commands (add, commit and push). We will explain that later.
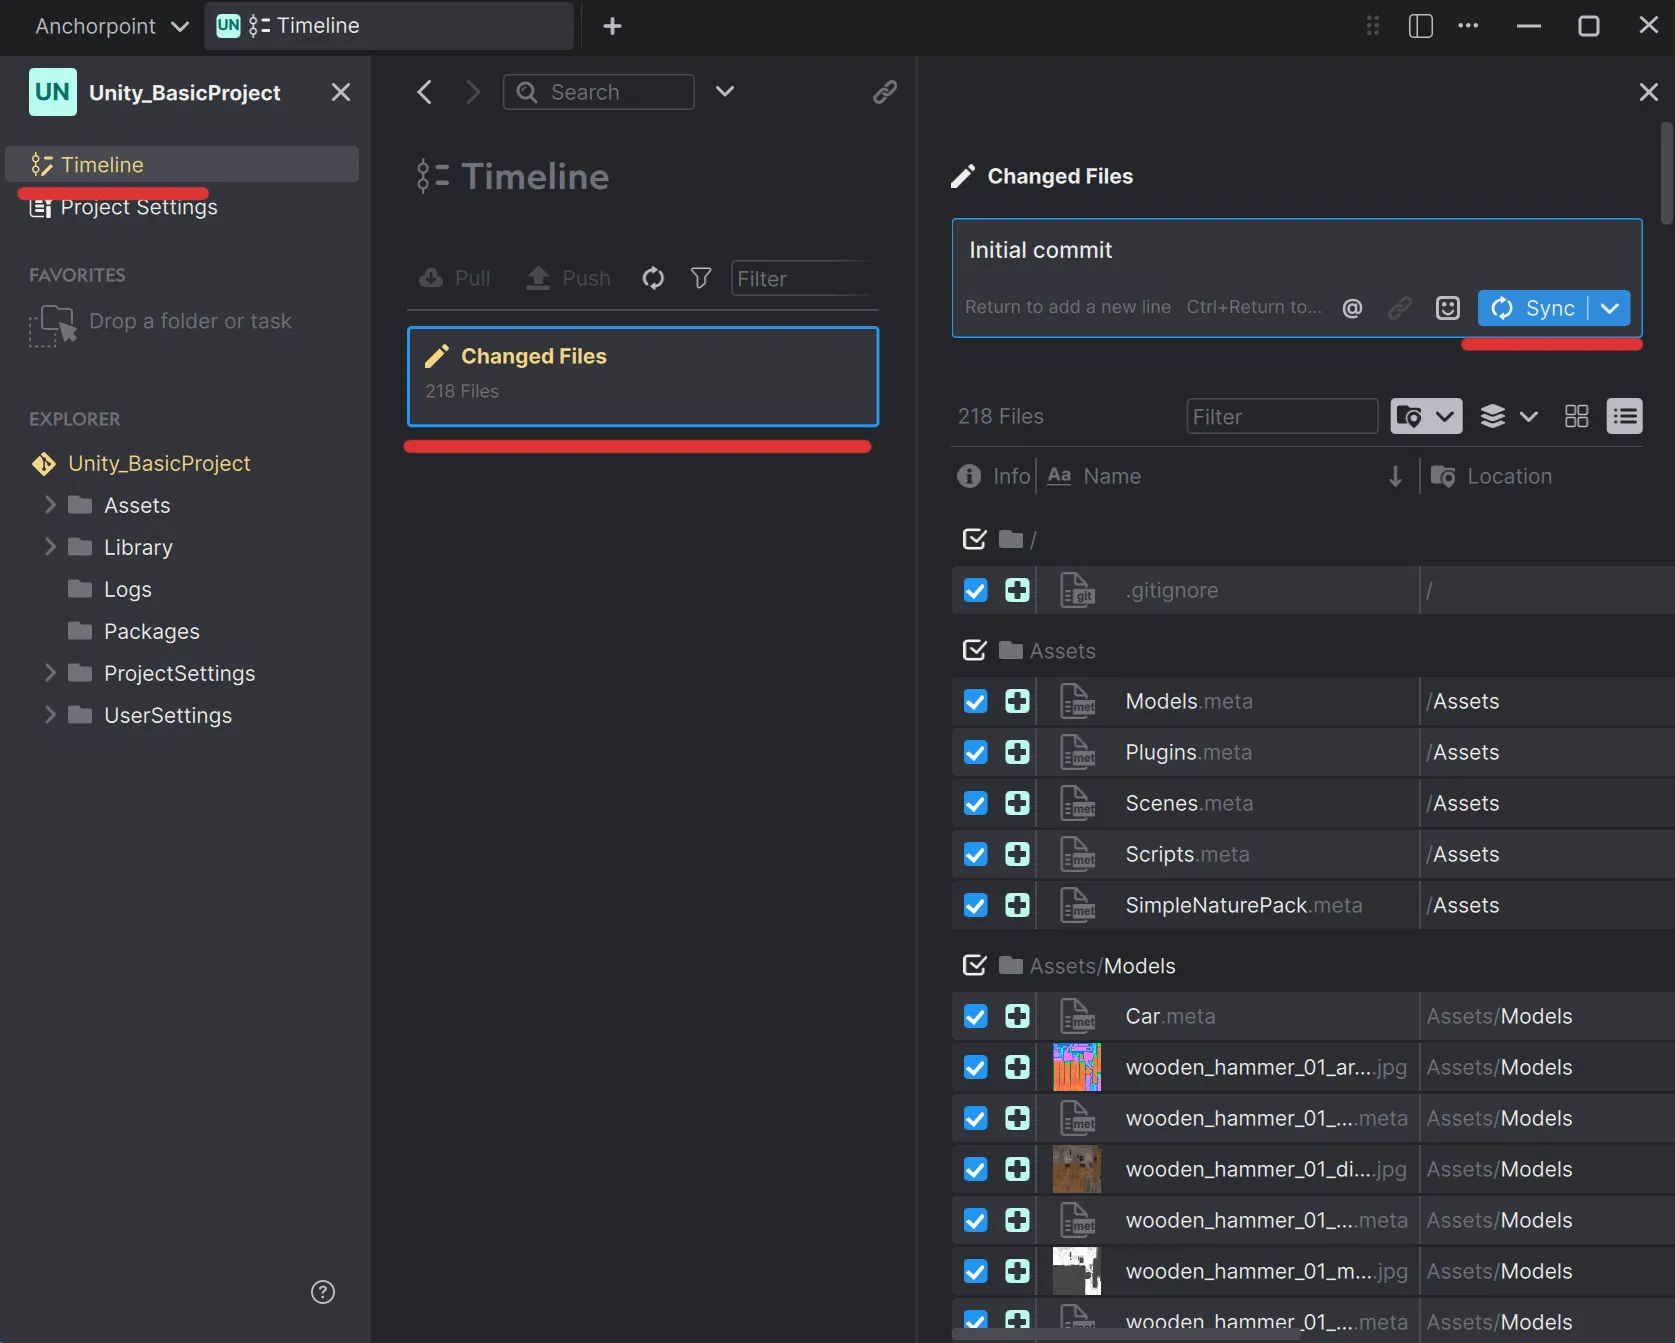
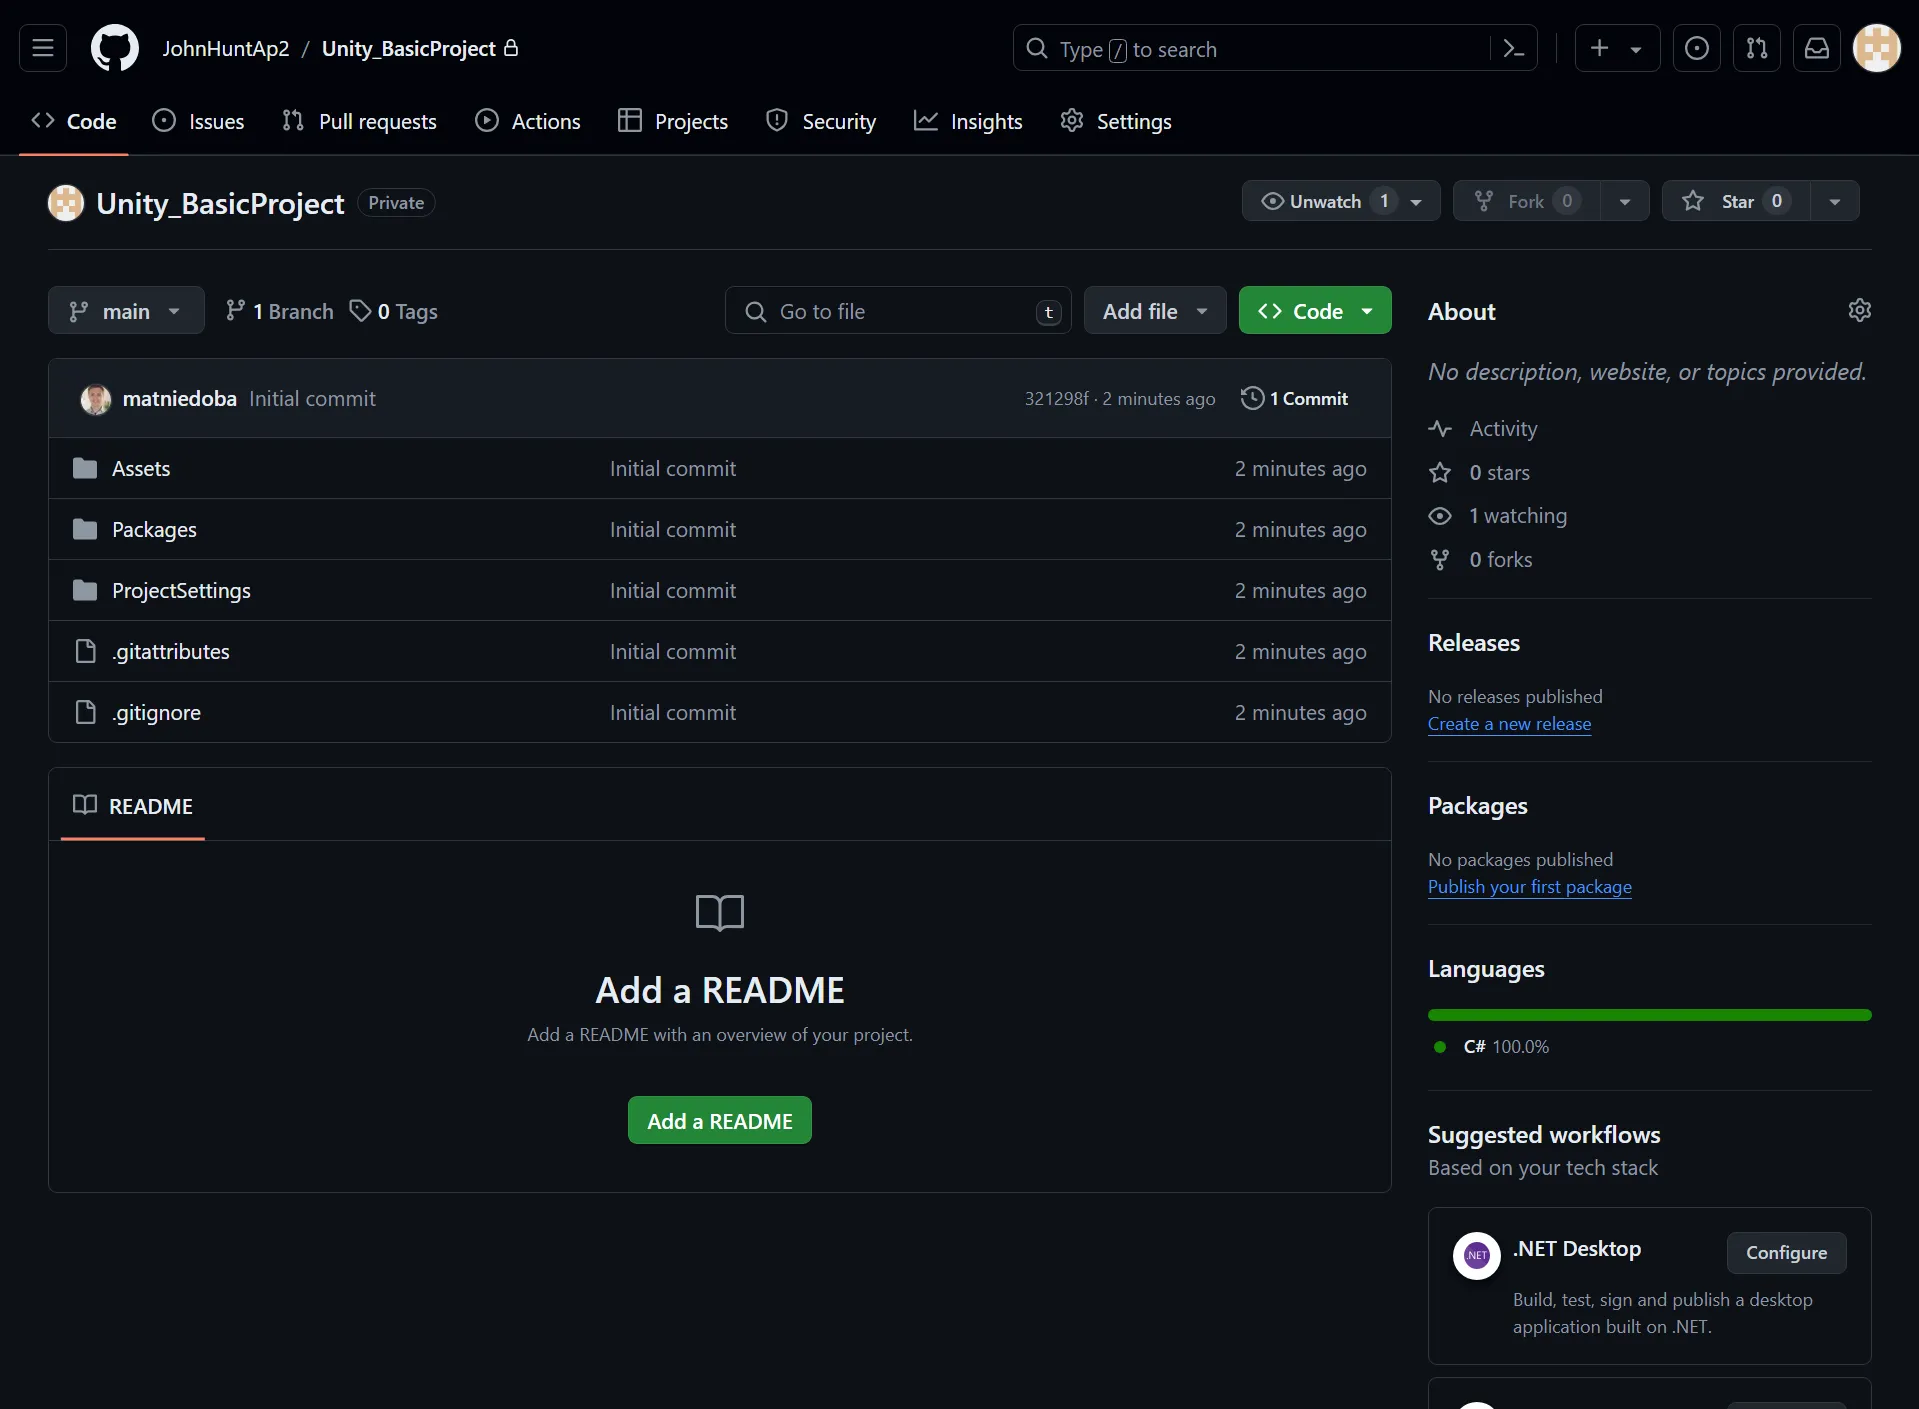
That's it, now you have uploaded your Unity project on GitHub and are ready to use version control.
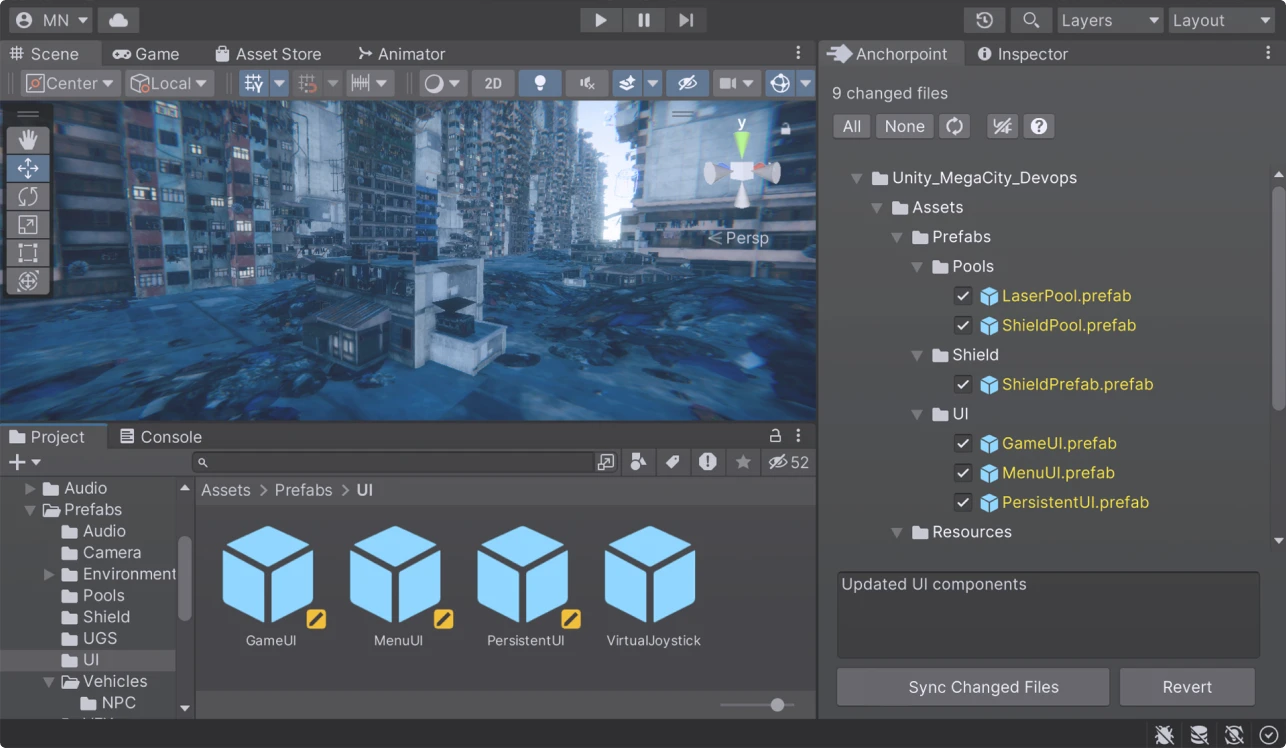
If you want to commit directly from Unity and see the file status directly in your editor, you can also use the Anchorpoint Git plugin for Unity. In Unity:
https://github.com/Anchorpoint-Software/ap-unity.gitThis will tell Unity to download the plugin as a package. Watch the video below to see how to use the plugin in your Unity projects.
Anchorpoint automates the setup process for Unity with GitHub by automatically handling binary files and metadata, eliminating the need for manual configuration and keeping the production pipeline moving.
This setting is normally enabled via default for Unity 2021 and above. Visible Meta Files and text-based asset serialization is much nicer to maintain and use with version control systems.
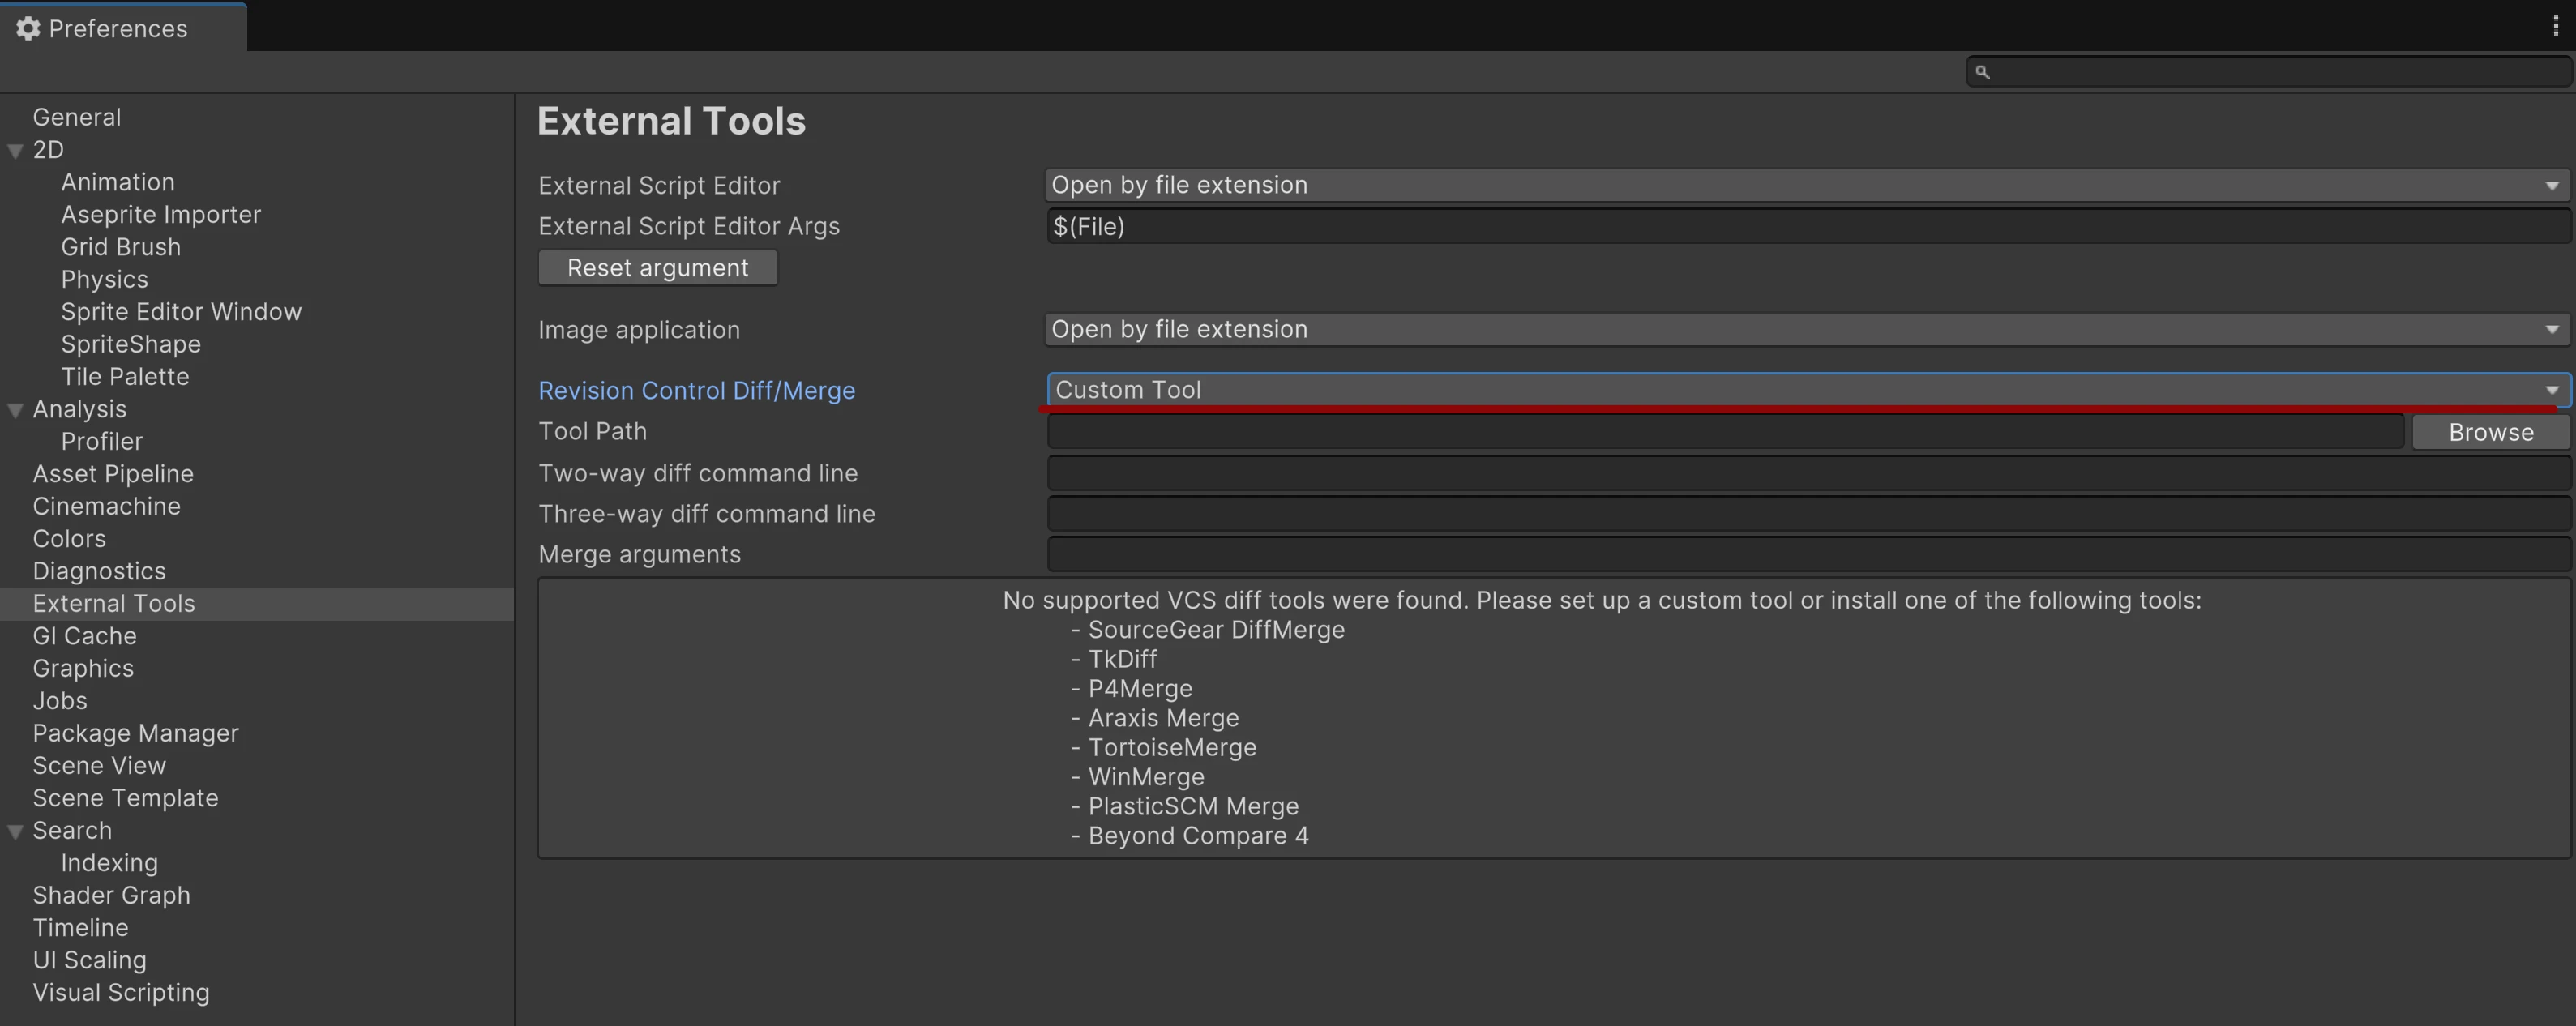
Diff tools help you to better visualize code changes and to review work from other developers. Anchorpoint has an internal diff view, that you can access from the timeline but there are also many free and paid external tools with advanced functionality.
A .gitignore file is a central component for managing your Unity projects using Git, which is also the foundation when pushing files to GitHub. It is a set of rules that tells Git which files to exclude from version control. You don’t want to commit content from the Library or Logs folder as this content is generated by Unity.
Here is a quick overview what belongs into a .gitignore for Unity. Of course you can add more rules depending on which plugins or IDE you are using. Using the “**/” upfront tells Git to look into subfolders as well. This allows you to put your Unity project inside a subfolder of your Git repository if that is desired.
**/[Ll]ibrary/
**/[Tt]emp/
**/[Oo]bj/
**/[Bb]uild/
**/[Bb]uilds/
**/[Ll]ogs/
**/[Uu]ser[Ss]ettings/
Anchorpoint will generate a .gitignore file automatically from a preset when it will create the repository.
Git LFS is the shortcut for “Large File System”. It’s a module in Git that handles large binary files.
Git by it’s design is storing all the content in it’s main database. This database is shared across all team members. Git is also a “decentralize” system as everyone has a copy of this database and can modify it. That’s also why it can operate so fast. However, adding large binary files (3D models, textures etc.) to that database, will blow it up and slow it down. Each Git operation will become slower. Git LFS offshores the large binary files to an external location. GitHub and other Git providers, use an S3 bucket for this, which is infinitely scalable. Git LFS will then store a small entry in the database that will point to that bucket. When you pull a commit, Git LFS is then downloading the original data from the bucket, but only as much as you need.
In Unity, you will use Git LFS for textures, audio, sprites, images and 3D models mostly. On GitHub you need to know that GitHub is providing you with 10GB free storage per month. Everything above that is billed by metered billing.
To configure Git LFS, you need to add a .gitattributes file. Anchorpoint configures that file automatically. If you don’t use Anchorpoint, you have to tell Git, which file extension will be tracked as Git LFS, such as FBX, PNG etc.
The easiest way to configure Git LFS is create a .gitattributes file. Similar to your .gitignore, the .gitattributes file is a set of rules to tell Git how to handle specific file types. Furthermore, the .gitattributes file will also tell Git which merge tool to use for a specific file type. More on that later. For Git LFS, you have to tell it to use the “filter, diff and merge = lfs”. This means that Git won’t merge your binaries, nor show you a diff like on a text file. The “filter” comes form applying the LFS smudge filter that is executed when Git is e.g. staging your files.
# Unity files
*.meta -text merge=unityyamlmerge diff
*.unity -text merge=unityyamlmerge diff
*.asset -text merge=unityyamlmerge diff
*.prefab -text merge=unityyamlmerge diff

# Binary files
*.EXR filter=lfs diff=lfs merge=lfs -text
*.FBX filter=lfs diff=lfs merge=lfs -text
*.jpg filter=lfs diff=lfs merge=lfs -text
*.png filter=lfs diff=lfs merge=lfs -text
Anchorpoint will automatically add binary file to the .gitattributes file. So you don’t need to worry about it.
Regardless if you use version control or not (there is no reason to not use it) prefabs will help you to manage larger projects. First of all you can split your scene into logical components and second, you can reuse these components across other scenes. For team collaboration, if you make changes on a component, you just modify the component file and not the scene. This will prevent merge conflicts (where two people work on the same file at the same time) and will also make your commits lighter. So, get familiar with using prefabs.
Merge conflicts can happen when working asynchronously, which version control allows you to do. It is normal that e.g. two people will accidentally work on the same file at the same time. If that happens you need to resolve a conflict. Resolving a conflict simply means to pick file modification should stay and which one should be dropped.
Unity YAML merge
The Unity YAML merge (or smart merge) tool merges two text files in a semantic correct why. Git by itself has an integrated merge tool that can merge text files line by line. If you edited line 10 in a text file and your team member edited line 20 for example, the Git merge tool can easily combine your edits in a new text file. For Unity prefab and scene files, it’s a bit more complicated. Yes, they store text but you cannot merge these file line by line as your scene will break. For example, adding a new component will modify multiple lines in different places in your prefab file. When two of you worked on the file at the same time, the Unity YAML merge will combine the two files together in one piece. And it can fail as well. Then, you need to use an external merge tool such as P4Merge or the one from Cursor or Visual Studio Code.
Take a look at the Unity documentation to see how you can configure the Unity YAML Merge.
File locking - the better alternative
In practice, it’s safer to lock prefabs once you start editing them. A file lock means that if you work on a file, it is made write protected from everybody else. This is a way to prevent other people from working at the same file at the same time, so merges, which can cause conflicts are avoided upfront. For binary files you cannot use merges either.
If you use Anchorpoint, it will lock files automatically once they are modified. So if you modify a prefab, it will be automatically locked for anyone else in your team to avoid a merge conflict.
There is also the option to lock files without Anchorpoint, using Git LFS locks, but then you have to use the command line to lock a file.
When it comes to file locking, unlike other applications, Unity won’t respect the read-only property of a file. If you save over it, it will just ignore and save over. You can overcome this by building a custom editor script that hooks into the save command and checks if a file is read-only before proceeding with save. However, this can also lead to unwanted side effects.
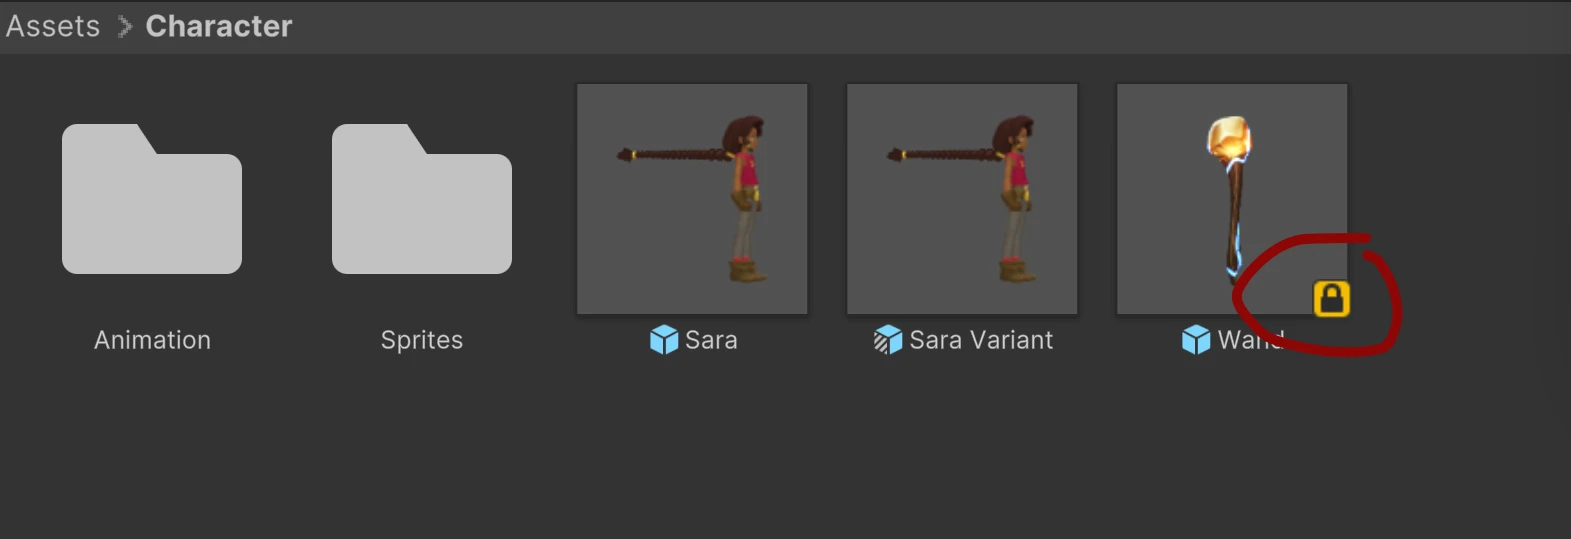
When using Anchorpoint, you can use the Unity plugin that will not only respect the read-only property of a file but also show you locked files directly in the Unity editor. You can also commit from a docked window and it will also take care of the meta files.
A good practice is to commit (in other words publish or submit your work) at least once a day, or even better, when you finished working on a meaningful task. Commits in most cases will refer to a task that you are accomplishing and that is noted in your project management app such as Jira or Codecks.
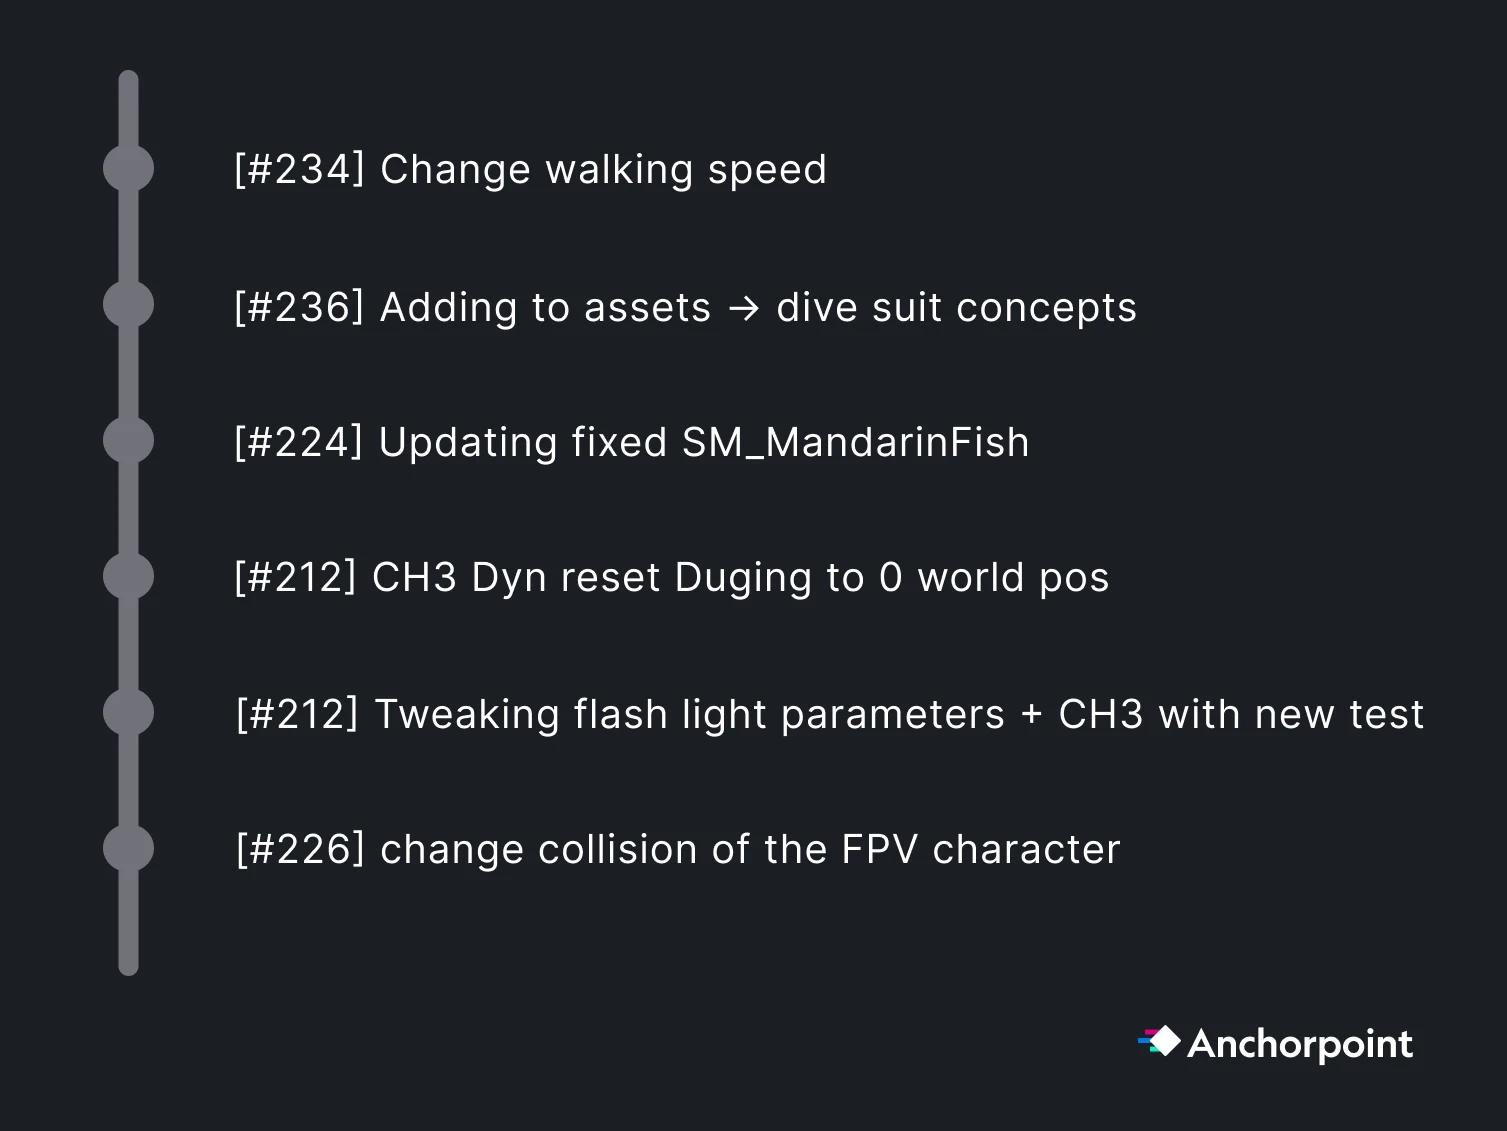
If your project management app provides a unique ID per issue, then attach it to the commit message, so you can always trace down all the contributions (all the commits) to a particular task.
Committing in Anchorpoint means to check all the files that you want to publish, then add a message into the text field and press sync.
Committing via the command line requires you to do the Git steps manually.
git add .git commit -m “I modified some files”git push origin mainGit has many option to restore your project to a given point when something went wrong and your project got broken or files got corrupt.
Reverting not yet committed files
These files are modified only locally and their version has not been committed to GitHub yet. In Anchorpoint, you will see these files in your “changed files” section. There you can simply select the ones that you want to restore, do a right click and pick “Revert”.
Restoring a previous state that has already been pushed to GitHub
You cannot delete commits, that are already pushed to GitHub. What you can do is to checkout, basically open the project at a particular point in time, where it was working properly. Then, you want to continue to work from there.
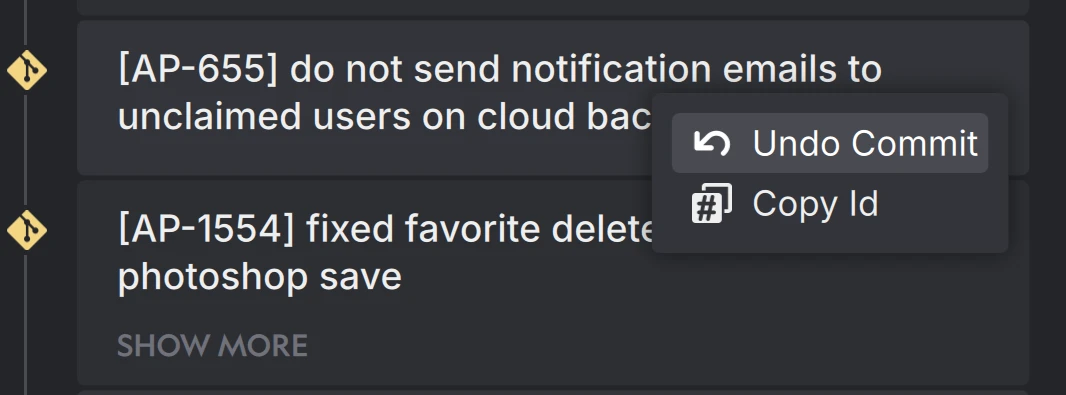
In Anchorpoint, you can simply undo a set of commits that have been pushed. It will modify your files back to the state that you want. So you end up seeing a set of changed files. To do that, click on the commit that you would like to get rid off, and then pick “Undo Commit”. It will not remove the commit, but create a set of changed files, which will represent the opposite of that commit.
Unlike Perforce, Git provides strong branching capabilities. If you never worked with a branch, you can see it as a mode. Think of it like a virtual folder of your project. Switching a branch is like working on your project in another virtual folder which has the exact copy of all your files.
The biggest benefit is, that you can change any file without breaking your project. You are working in a safe space here.
Branches are often used to implement specific features. Your team can work on something else, while you work e.g. on a new character controller. Once you finished your work, you need to “merge” your branch into the main one. Merging means, that all your changed files are brought back to the original project folder.
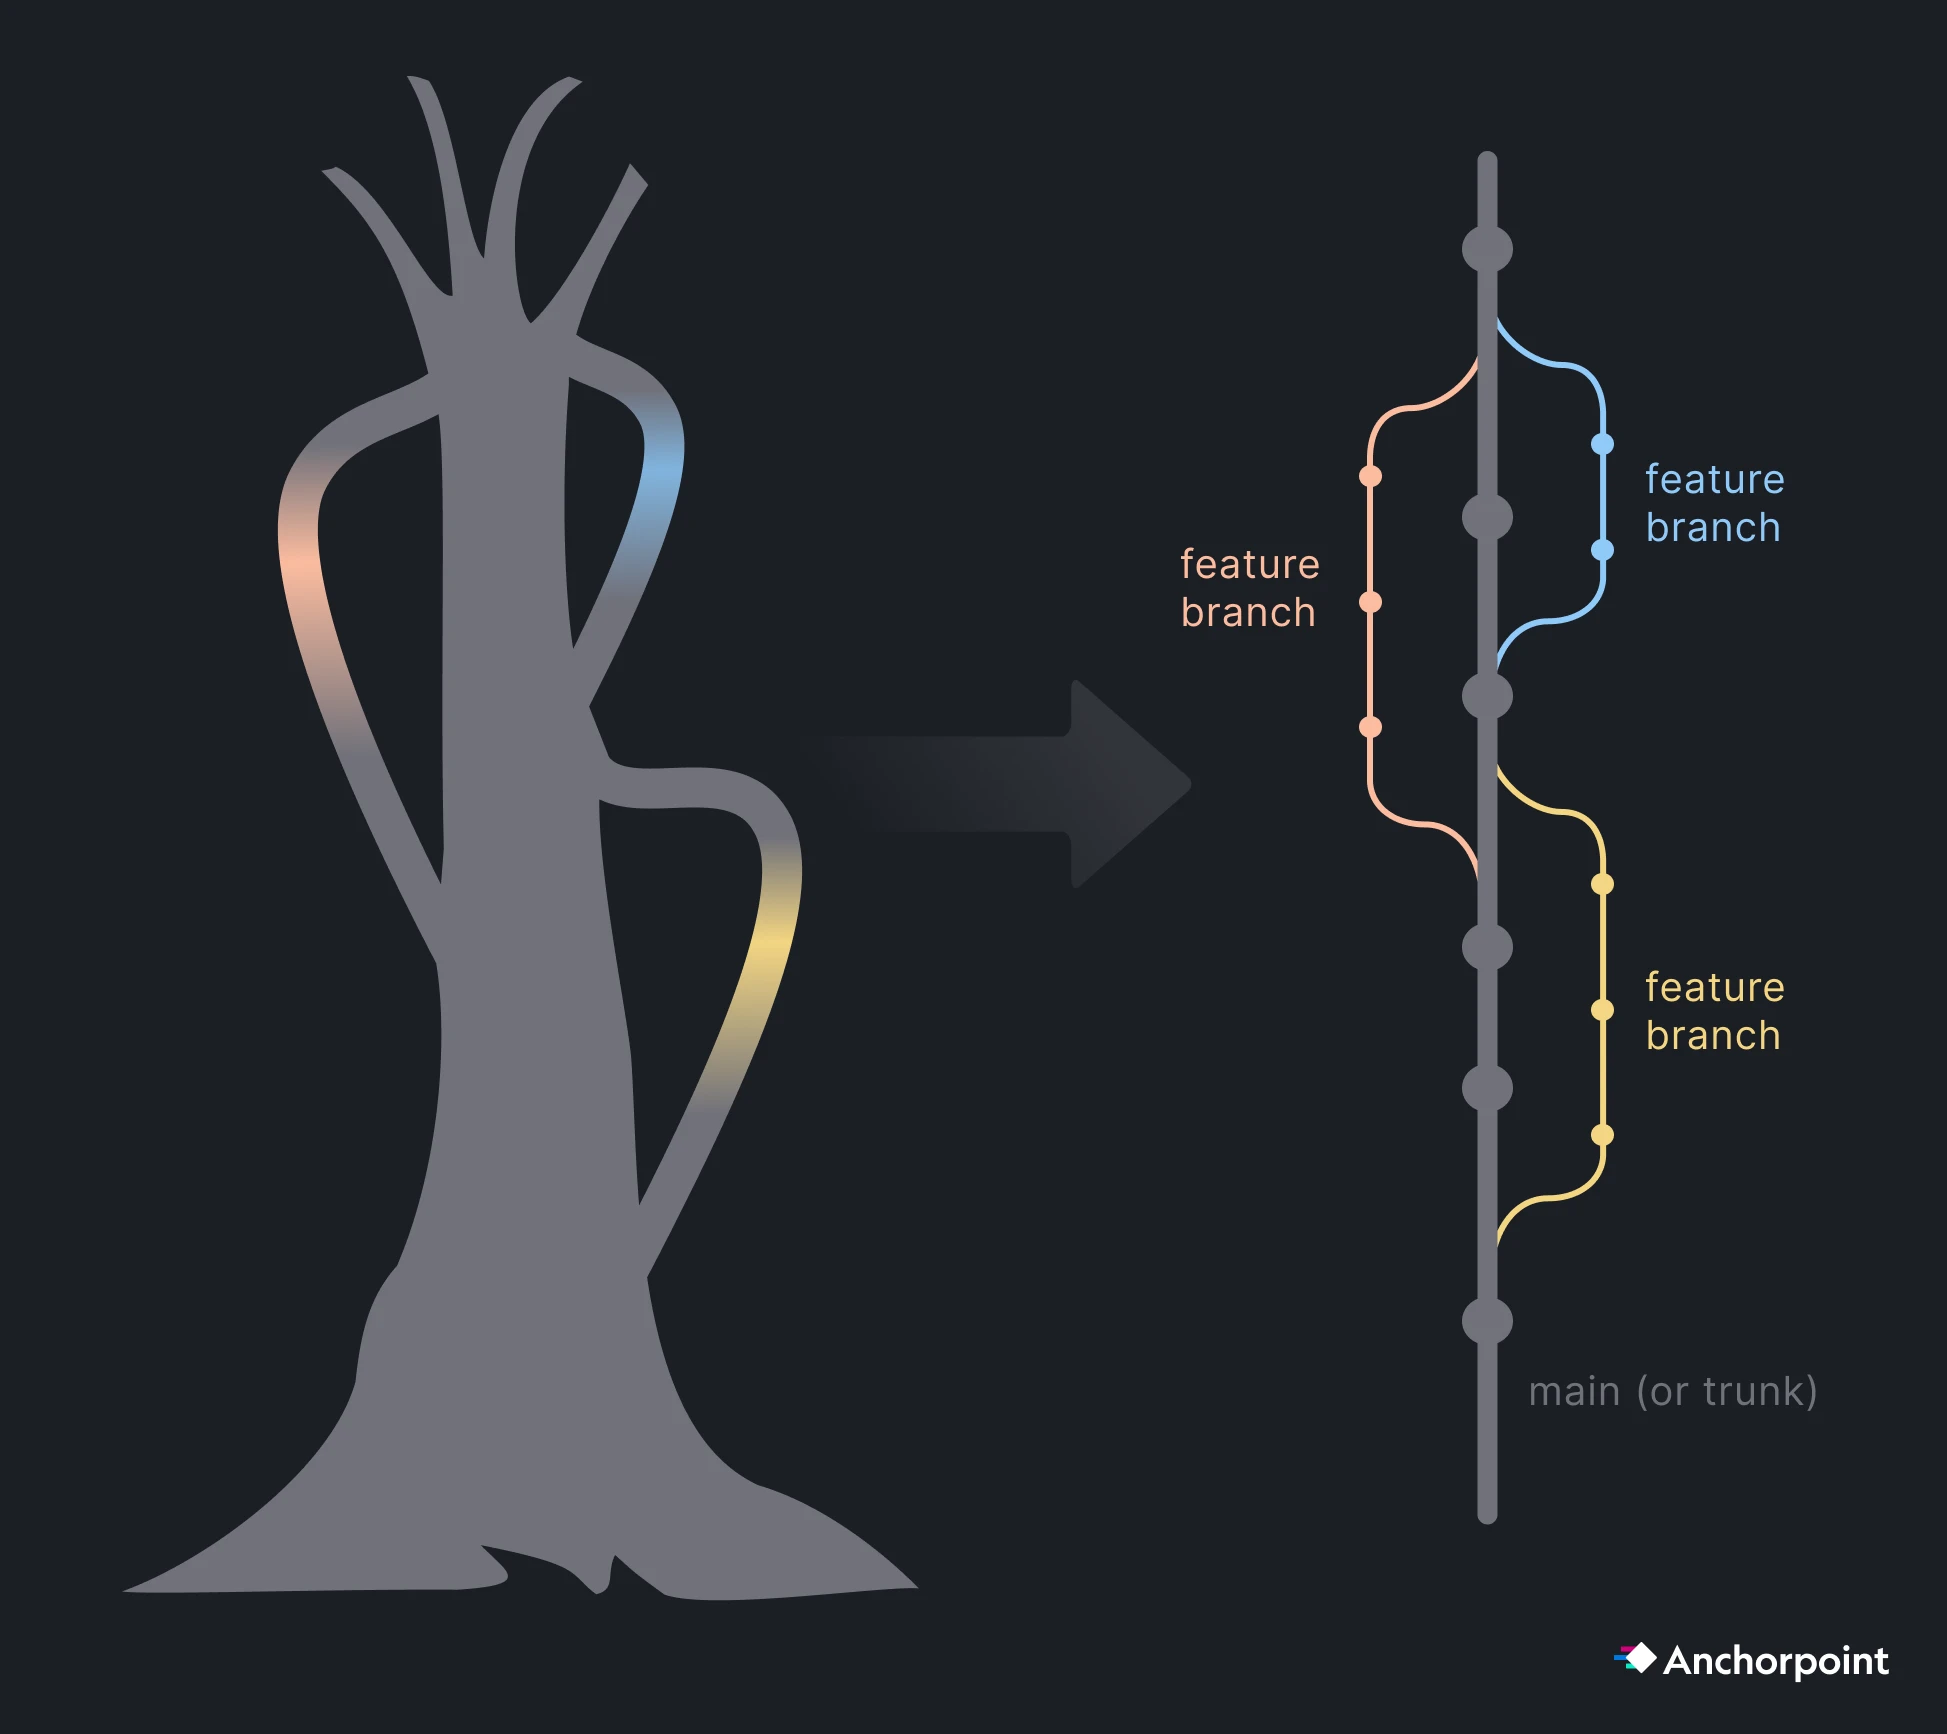
The main branch is often called the “trunk”. Think of a large tree where everything goes out and (unlike real trees) is coming back to your tree. So the rule is, branch out of trunk and merge back to trunk. Even if you can branch and merge out from other branches, don’t do that to create further complexity.
If you work alone, just work on the main (or trunk). Once your team gets bigger, allocate feature work on specific branches. Artists should keep working on main as they usually edit things that don’t break the project entirely and to avoid complexity.
The “Pull Request” is a feature that does come from Git itself, but was introduced by GitHub. Overseeing large open source projects and merging code from contributors became much more complex. A Pull Request is basically an approval workflow. The term “Pull Request” sounds a bit confusing. GitLab also calls it “Merge Request” which is in my opinion more accurate.
Creating a “Pull Request”, means that you finished working on a feature on a specific branch and you want that your work will be merge into main. That’s basically the same as publishing your work to the team. A pull request requires a comment on what you have changed, so that a reviewer can take a look at your work, suggest improvements and then merge it into main. Working this way ensures that only working code will be added to the main branch and due to reviews your code quality is guaranteed.
Nowadays when working with AI Agents, working with pull requests become more critical than ever, as Agents generate a lot of commits which need to be reviewed.
Part of trunk based development is also to have a release branch. This branch is only merging from main to release and in most cases never merging back to main. You also don’t do any work on the release branch, it’s just for having a place to oversee all your releases of your game. Sometimes you might need to do a hotfix or a patch of your game that is already published. There, it makes sense to do the work on the release branch, because you can “checkout” the project at exactly the state when it was released and work on your fix.
Tags are useful to add a label to a commit, that marks the state of a release. E.g. you can tag your commit with “v 1.5.1”, so you always see at which state your project was released from the Git history.
Git is a decentralized version control system. This means that everyone can write an own “history” of how the project progresses. But at some point, you have to bring everything together into one central source of truth. Your source of truth will be your Git repository on GitHub. However, there is a problem here:
Problem: User A and User B have a different history. Their project looks different, but it needs to be the same as they work in the same team.
The solution is Git Rebase, it will rewrite the history of User A, so that it conforms to the same history of User B that is in sync with GitHub.
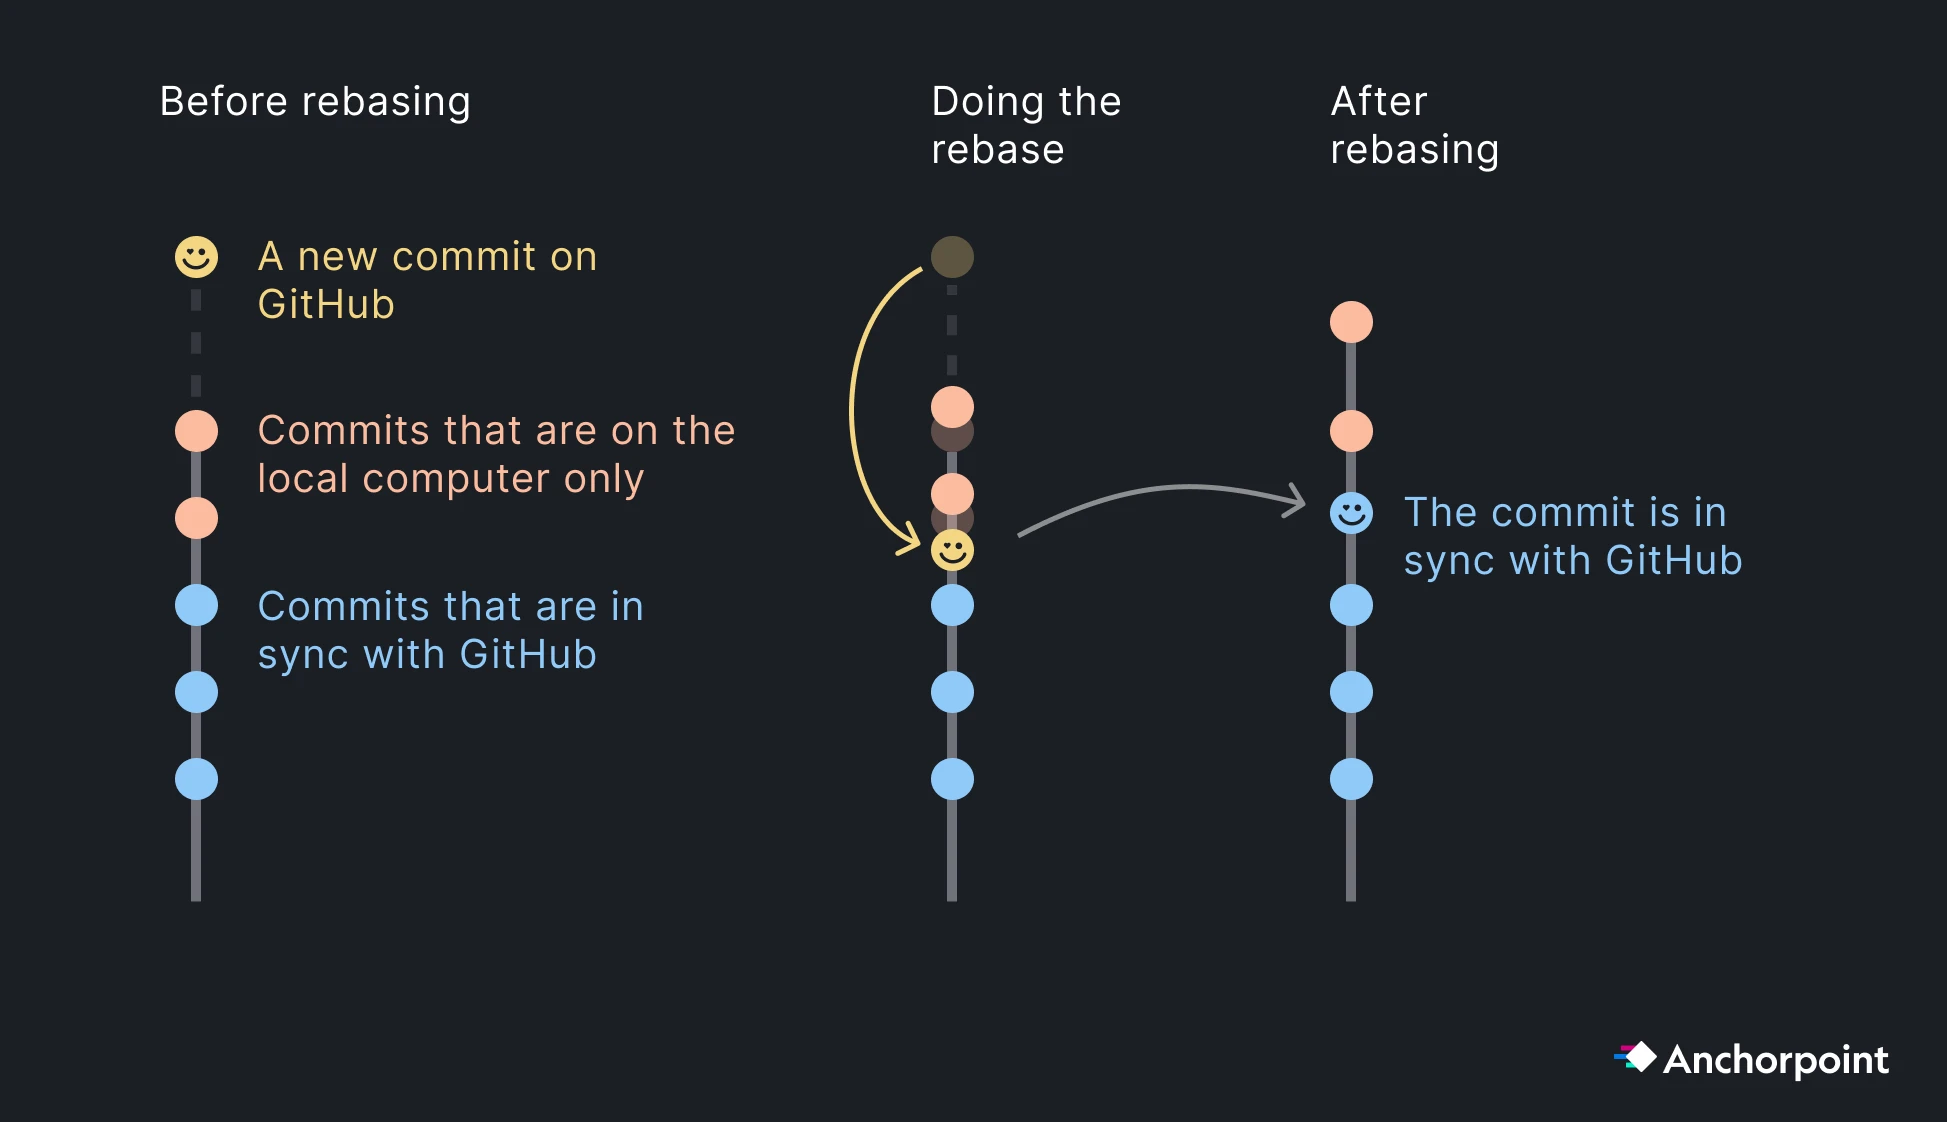
When User A asks GitHub for new changes, he will be able to pull the Commit of User B. Then, Git will not simply add this commit on top of user A, but below the commits of User A. Then, User A can push the local commits and is in sync again with GitHub.
The rebase process happens mostly on pulling new changes and when merging a branch. Anchorpoint will automatically rebase your commits when pulling. If you use the command line you have to explicitly use the git pull --rebase command.
Even when using file locking, it sometimes can happen that merge conflicts appear. When using Git without Anchorpoint, that can be a bit tricky as during the conflict resolving state, Git LFS will replace your actual conflicting file with a 1KB sized pointer. That might feel like data is corrupted, but it is not. After resolving the conflict, the proper file is being restored.
When using Anchorpoint, it will warn you upfront of a pull, if a potential conflict can happen. In this case, Anchorpoint wants you to commit your conflicting file, so that all your work is stored in the version history. Then, you can resolve the conflict.
Resolving a conflict on binary files does not really mean dropping the work of somebody. It’s just about deciding, what is the latest version. You can always restore the “rejected” file version later.
Continuous integration and continuous deployment (CI/CD) are DevOps practices that help teams efficiently develop and release high-quality software. Within the Unity environment, CI/CD can automate various tasks, such as running tests across multiple builds or deploying to multiple platforms with a single action.
Implementing a simple pipeline can help identify bugs early in development and automatically generate and deploy builds for team leads to review and QA to test, whether on every commit, daily, or weekly. This streamlines production, minimizes overhead for team members, and allows them to focus on their core tasks, such as coding, art, or design. Read our guide on setting up a CI/CD build pipeline for Unity using GitHub Actions to learn more.
Git can show you the history of a single file, which can be handy to understand certain modifications and why somebody made things this way. If you are using the command line, you can access the history via git log -p —<filepath>. On text files, it will give you the content, what has been modified. On LFS files such as images, it will only give you the file hash, which is not that helpful.
In Anchorpoint, the history per file is located in the sidebar when you select a file. If you are e.g. inspecting the history of an image, you will also see how the image looked like on a particular version.
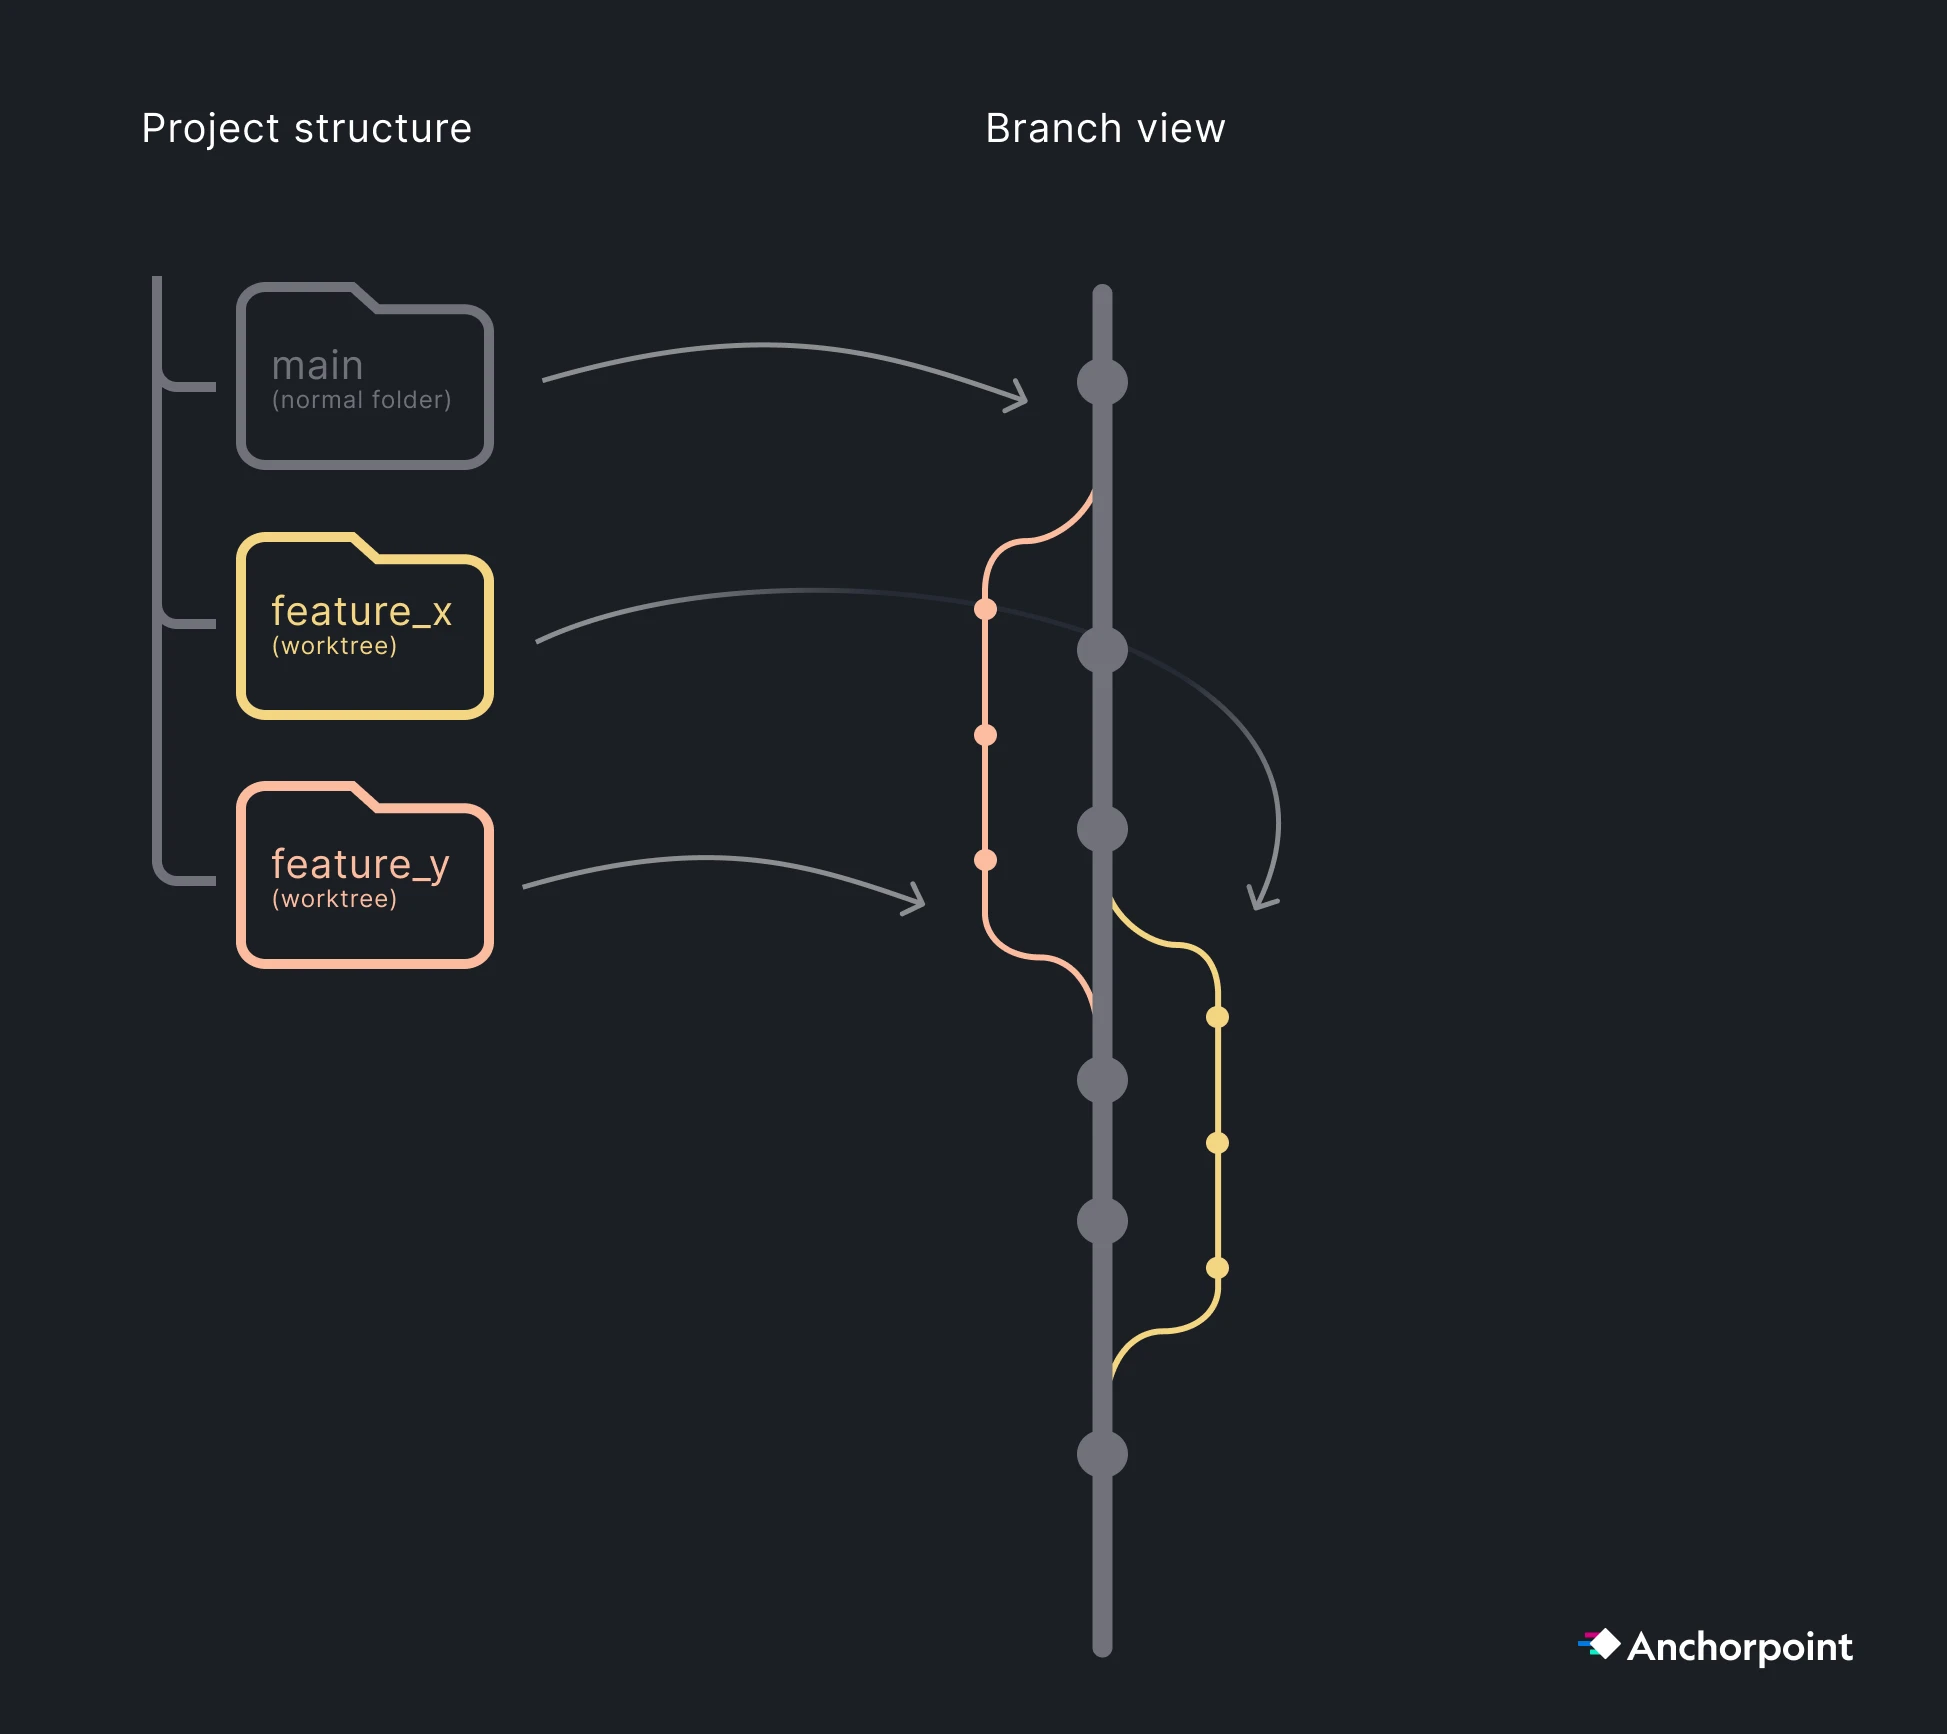
If you are using AI as a coding assistant, than you normally don’t need to bother about this. However, when working with multiple AI agents such as Claude Code or Codex in parallel, you don’t want them to work on the same project folder as they will interfere with each other and mess up your codebase. Each agents has to be treated like a human that works in it’s own isolated space.
Git has a build in solution for that, which is called “Worktrees”. A Git worktree is an isolated space that shares. the same .git folder, including all LFS caches. Git will create a new folder on your hard drive where your agent can also work on another branch.
There are some things we need to cover that you only need when working on larger Unity projects. Large means millions of files and hundreds of people.
To save storage space, you can select which folders of a Git repository should be synchronized and which should not. This is useful if, for example, you store your art assets in the Git repository and the programmer in your team does not want to download these files as he is working on some server implementation.
Another benefit is that selective checkout improves your file tracking performance, especially if you have a repository with millions of files, but you only need to work on a subset of them.
When cloning a repository in Anchorpoint, you can also pick the option that it won’t download any files. Then, in the folder tree view on the left sidebar, you can always pick to checkout a folder. This means, that the folder will be downloaded and tracked by Git.
Using the Git command line, you have to apply a two step process
git sparse-checkout initgit sparse-checkout set path/to/your/folderSubmodules are often a controversial topic in Git. Some developers avoid them due to complexity and indeed, submodules per default have certain caveats.
If used correctly, submodules give you a great tool to manage larger projects. Here are use cases for submodules:
How to import a submodule into your project
Simply use this git command to add a submodule to your project: git submodule add <https://github.com/user/repo.git> path/to/subfolder. If will modify a .gitmodules file that you then need to commit in the same way as the .gitignore, so that everybody in your team will have access to the submodule.
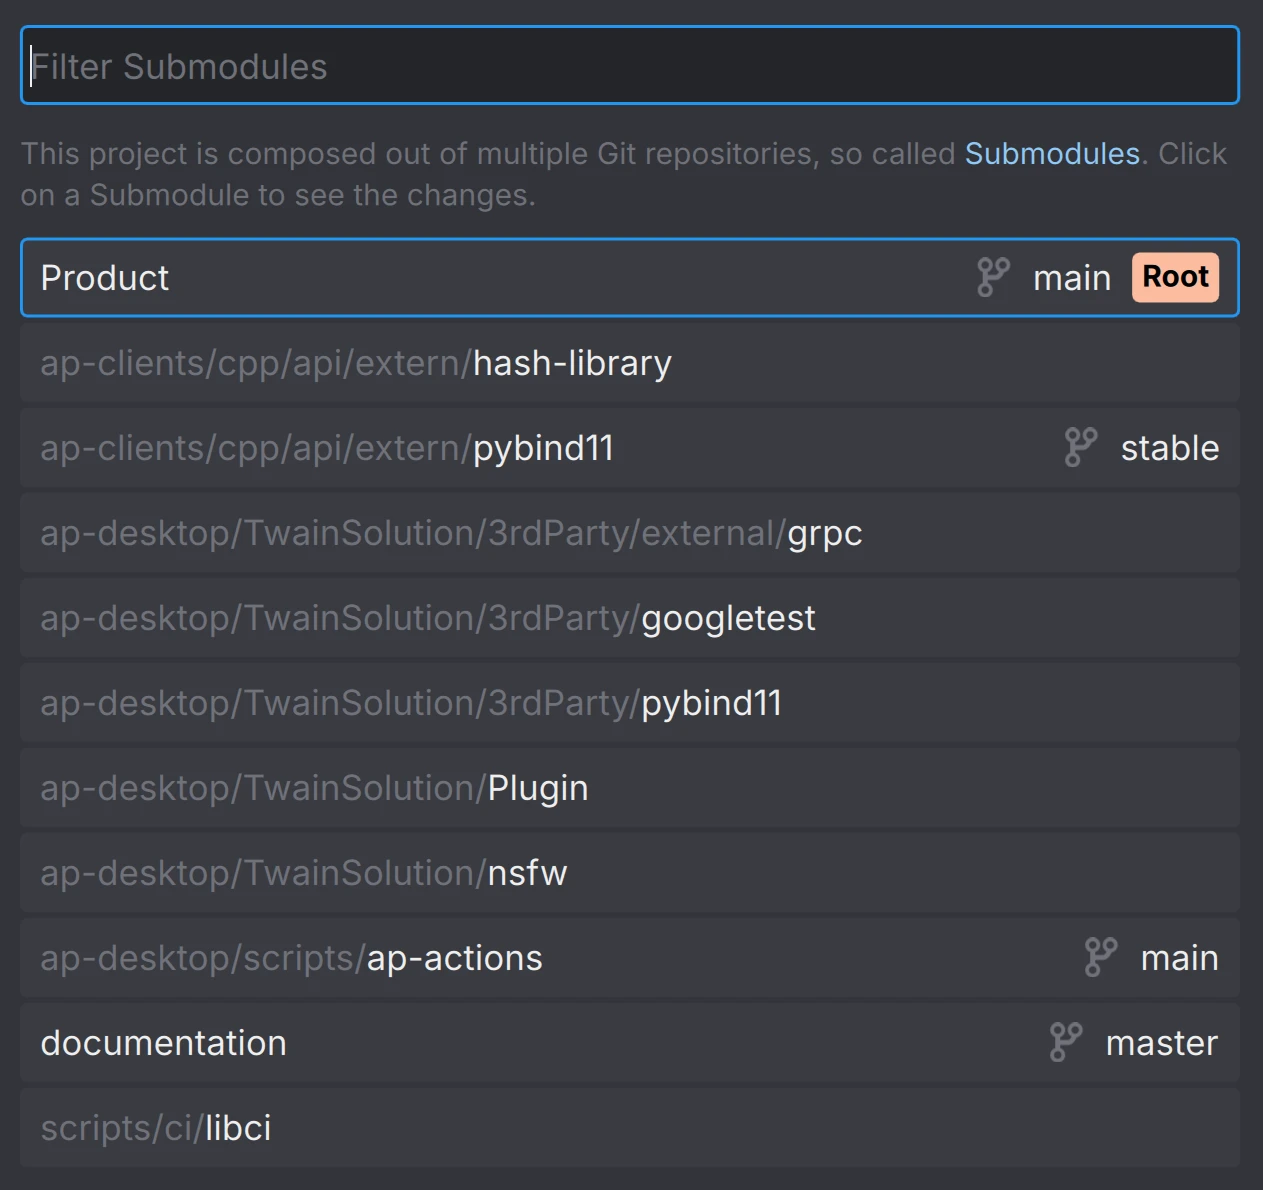
Anchorpoint will show you a list of submodules and manage also the typical caveats of it. You can access the list of submodules from the timeline.
Challenges when working with submodules
The most annoying (but sometimes useful) feature of submodules is the submodule link in the main repository. It makes sure that the submodule version aligns with the one in your main repo. To do that, you will see a submodule link in your main repository, that will always show up as an entry in your changed files if you modified the submodule. In case you are e.g. using an external package, where the correct version is crucial to your game project, that makes a lot of sense. You don’t want to just update the package without doing any adjustments in your main project that might be needed due to breaking changes. You have to treat this submodule link like a file that needs to be committed to you main repository.
However, on many cases, such as working with contractors or importing your asset library, that is simply annoying.
Furthermore, if you use the Git command line or another Git client in a submodule, double check that you work on a commit and not on a detached head. When committing files on a detached head (this means not on a particular previous commit) you are submitting files not on a branch but to nirvana. You have to then use a set of Git commands to get your changes back to the main branch. Anchorpoint protects you from that behavior.
Git normally scans the entire working directory to detect changes — slow on large repos. The filesystem monitor tells Git to let the OS report which files changed instead. It’s very easy to enable it.
Use git config core.fsmonitor true, so your Git configuration will be modified, that it will automatically start the file system monitor on the first Git status.
In Anchorpoint, you can apply this configuration automatically for all your users, so you don’t need to enter this command manually each time for each user.
Working with art (source) assets is much less complicated than working with a game engine. In most cases, you will just work on a separate art asset repository. Unless you are a one man show, do not mix it with the game engine content, for better access controls. In most cases, you will just work on the main branch as there is no need for feature branching.
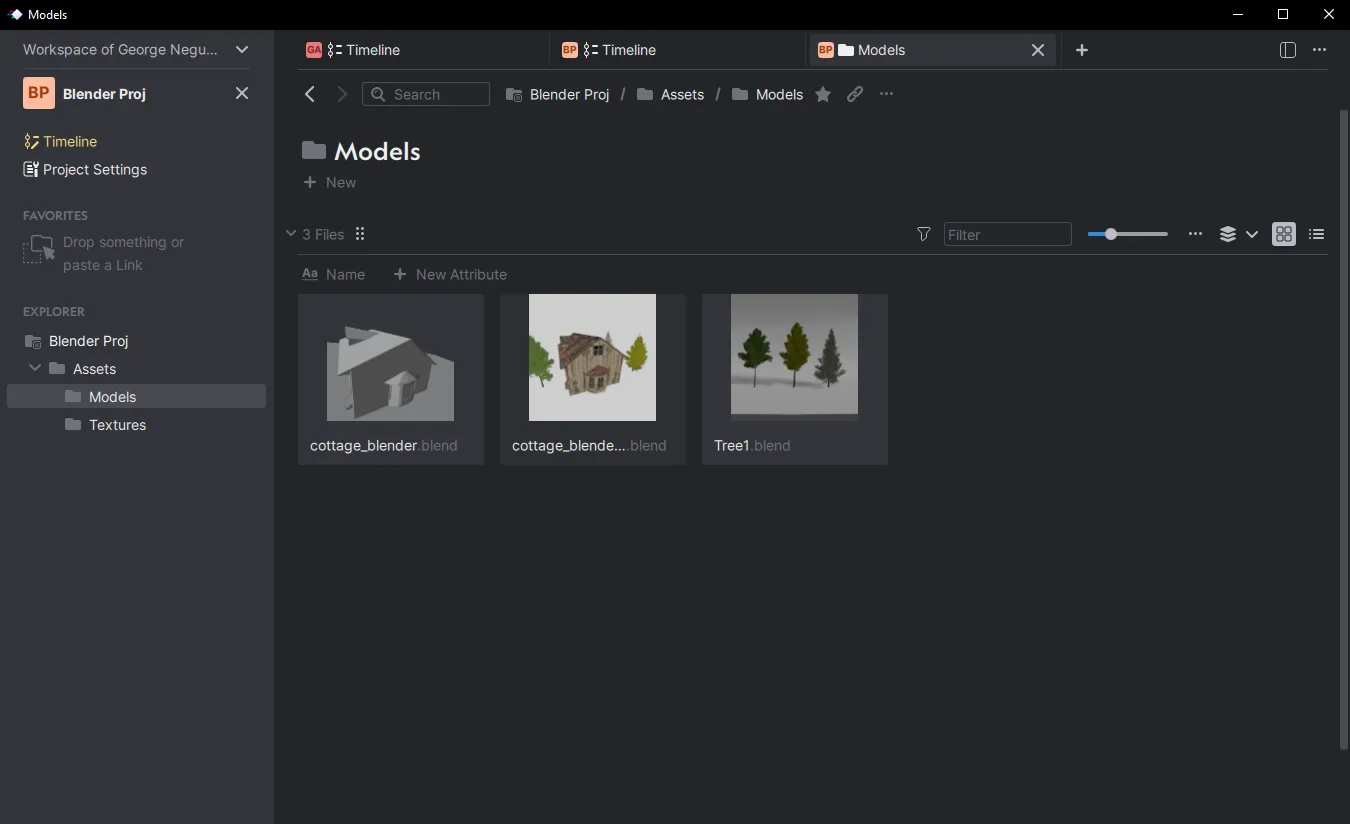
Art assets can get pretty big, that’s why it’s very useful to use Git sparse checkout, so that you can work only on one particular folder, instead of cloning the art repository.
Like with the game engine, make sure that your .gitignore is configured properly. This example excludes all the blend1, blend2 etc. files that are generated by Blender.
# Blender specific files
*.blend[0-9]*
The same applies for Git LFS and your .gitattributes file. Make sure that file types are marked as LFS.
*.png filter=lfs diff=lfs merge=lfs -text
*.fbx filter=lfs diff=lfs merge=lfs -text
*.psd filter=lfs diff=lfs merge=lfs -text
If you use Anchorpoint, it will handle the .gitignore and .gitattributes automatically. When you create a new Git repository, there is an option for “DCCs” when picking the .gitignore template.
GitHub has some limitations when it comes to storage that can be an issue for game development. If you reach these limitations, a push will be rejected in Anchorpoint and you will get an error message. If these are an issue for your project, you may want to look to other solutions such as Azure DevOps or self-host your Git server using Gitea.
The free version of GitHub limits Git LFS file sizes up to 2GB. If you are on a paid plan, this limitation increases to 4GB, and 5GB (Enterprise).
With the free plan and Git LFS activated, you get 10 GB of storage and bandwidth (free each month) for your repository. If you exceed these limits, you will need to pay $0.0875/GB for bandwidth and $0.07/GB for extra storage. Use GitHub price calculator to get additional pricing info.
A Dropbox is likely to damage your project. If you have the Unity project open in a Dropbox on multiple computers (which is exactly what happens when you work in a team), Dropbox will sync files instantly. If you are working on the file (say a .unity scene) and your team member is also working on it, this will cause a conflict that Dropbox will resolve by renaming the file. This becomes a nightmare to sort out. Also, WIP scripts that are changed due to file syncing will make it impossible to launch your game.
Version control can sync files as well, but as the name says, with more control. It allows you to:
Setting up a version control solution takes only a few minutes. It's definitely one of the first things you do when you start a new Unity project. Similar to file synchronization, there are several solutions available.
There is (better said was) an official Git plugin for Unity from GitHub but it's deperecated since 2024. Here is the original code repository.
No, similar to the official GitHub plugin for Unity, Unity Collaborate got deprecated as well.
Git has the biggest ecosystem, so there are plenty of possibilities. GitHub offers a free tier with unlimited users and 1 GB of storage. It also provides a free Git LFS plan with 10 GB of storage and bandwidth and a maximum file size limit of 2 GB. Another option is Azure DevOps, which is free for five users with unlimited storage.
Git is a version control solution that was developed for building the Linux kernel and was initially released in 2005. Git is a decentralized version control system. This means that you have a copy of the whole repository on your computer. A repository is basically your Unity project folder on a remote server, e.g., GitHub.
The benefit of working decentralized means that you can fully work offline, you have an automated backup system, and file operations are way faster because you don’t need to wait for a server. To sync with your team, you push (upload) your files to the remote repository, and you pull (download) new file changes from the repository to your local computer. These steps are done manually, in contrast to Dropbox, which is syncing files instantly.
Git was made to deal with code, which is basically a bunch of text files. Games require a lot of binary files like 3D models, textures, sound files, etc. To keep the efficiency and to not download the whole history of your 3D models and textures, Git introduced an add-on in 2014 called Git LFS (Large File Storage). This add-on is now part of almost every Git product and service out there.
It helps to deal with binary files by storing them in a separate location on the remote server and replacing the original file with a 1kb sized pointer. This pointer only knows where the original file is so it can be downloaded to your local computer on demand. This allows you to save storage space.
When you decide on a Git hosting provider (GitHub, GitLab, Bitbucket, or Azure DevOps), you have to look at their Git LFS costs.
Unity produces a lot of overhead of files that store caches, build data, or anything else that you don’t want to upload to the Git repository. It will just take away space and slow down your push and pull procedures.
A .gitignore file is basically a filter that tells Git which files, file types, and folders should never be committed to the Git version history. Here is an example gitignore for Unity.
When a project becomes more complex or the team gets bigger, friction arises. Work in progress commits from e.g. developers can disturb the work of the artist. To prevent this, you can split the project into certain zones. Each zone can then be used by a developer or artist without getting in each other’s way. When the work is finished, these zones are dissolved and merged into the project. Git calls such things branches. A short video in our documentation explains them pretty well.
The recommendation is to keep the number of branches very small. The reason is, when you work on your own branch for a long time, you may never run into conflicts. But, once you merge that branch to the main line (imagine this like a giant commit), all conflicts that you ignored have to be solved now. It’s better to run into conflicts early and solve them quickly by working only on one branch.
If you need branches, Anchorpoint allows you to create and switch them in the dropdown in the Timeline next to the Pull button.
GitHub can work great if your project size is pretty small. As soon as you are in the double-digit gigabyte range, it’s smarter to pick another Git hosting provider such as Azure DevOps or self-host your Git server.